
ASCO in the UK should be able to supply the rubber windshield sealing strip. The late Bill Haverly, the famous ASCO Roadster Registrar, used to have batches made. It has a particular profile. Dave Green, our NASOC parts man may also have a couple in stock. Paul Beck can probably supply a more generic version that will work as well. He has a good line of rubber items.
Woolies in the UK carries this item that will work also. I use it on my pre-war cars:
http://www.woolies-trim.co.uk/p-1798-ru ... usion.aspx
The most popular muffler for the Roadster seems to be one adapted from a Ferguson tractor. The original was actually quite long and hangs on a rubber mounting ( the same as used on the leaf springs ) outside the chassis rail. I used to use a round Thrush performance muffler as it had an original look and was cheap and easy to replace. Not sure that these are sold any more. My last Roadster had a stainless steel system by Bill Haverly.
exhaust tube diameter was @ 1 1/2".
These were two options in the tractor range:
1: Massey- Ferguson Muffler, horizontal, round. 1-1/2" inlet ID, 1-1/2" outlet OD, 34" OA length, 3-1/4" diameter. Tractors: TO20, TO30, TO35 Continental gas; MF35 Perkins diesel, MF135.Product No. -- 505545M92 | UPC -- 758351771017
2: Horizontal MUFFLER Ford 2N 2-N 8N 8-N 9N 9-N Tractor
Heavy-duty horizontal muffler. Inlet 1-1/2" I.D., outlet 1-1/2" O.D., body length 23". Tractors: 9N, 2N, 8N (1939-1952). -- M1002
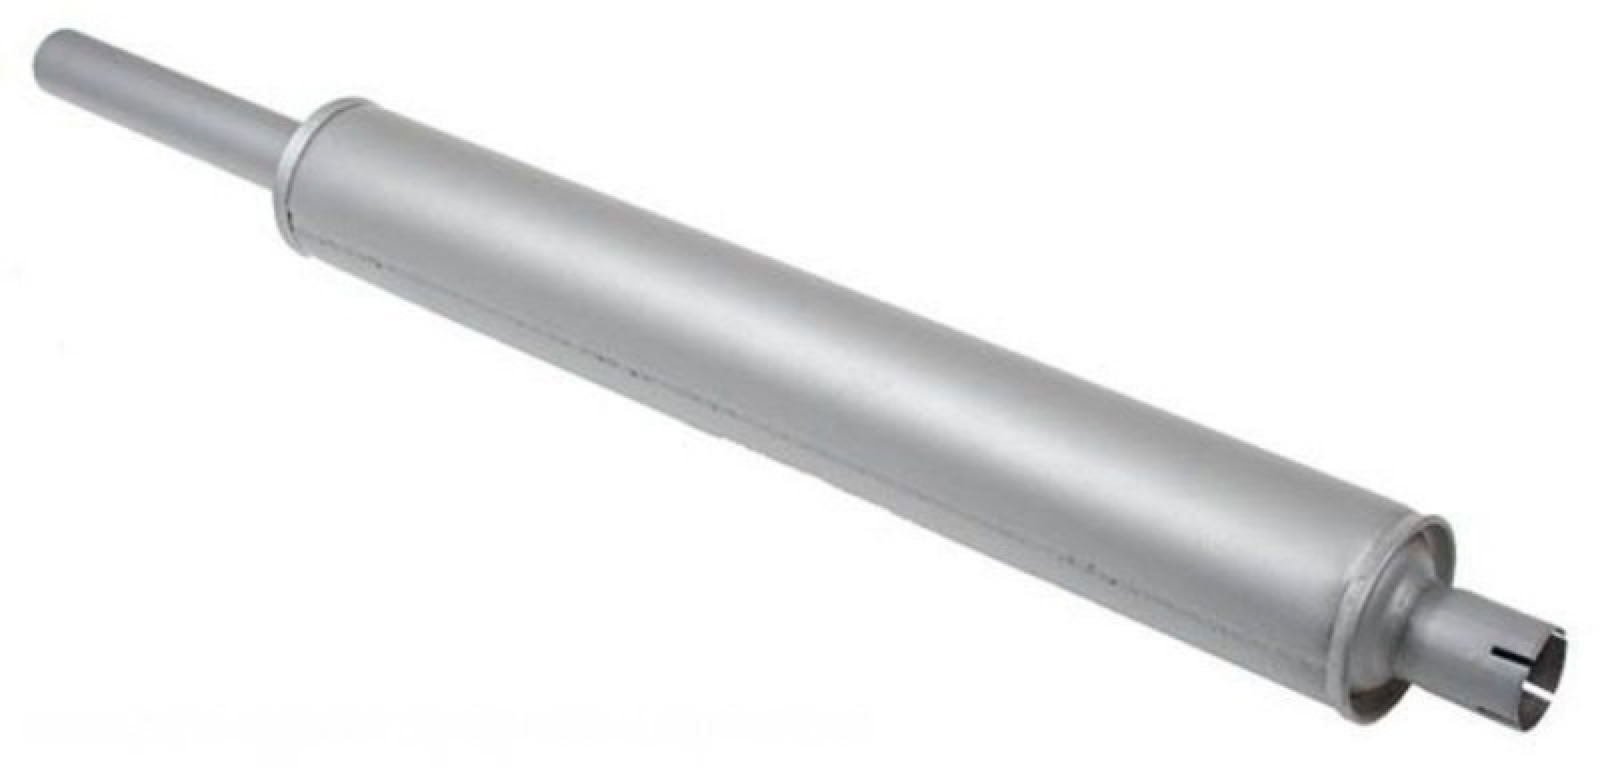
It would be easy to cut down the outlet tube length and add the standard design Roadster tailpipe. The body length of 23" needs to be checked to ensure that it fits in the space along the frame rail under the running board
Here's a great photo from Fred Tag's 4AD restoration album. Looks like he may have used the muffler I mentioned...or something very similar:
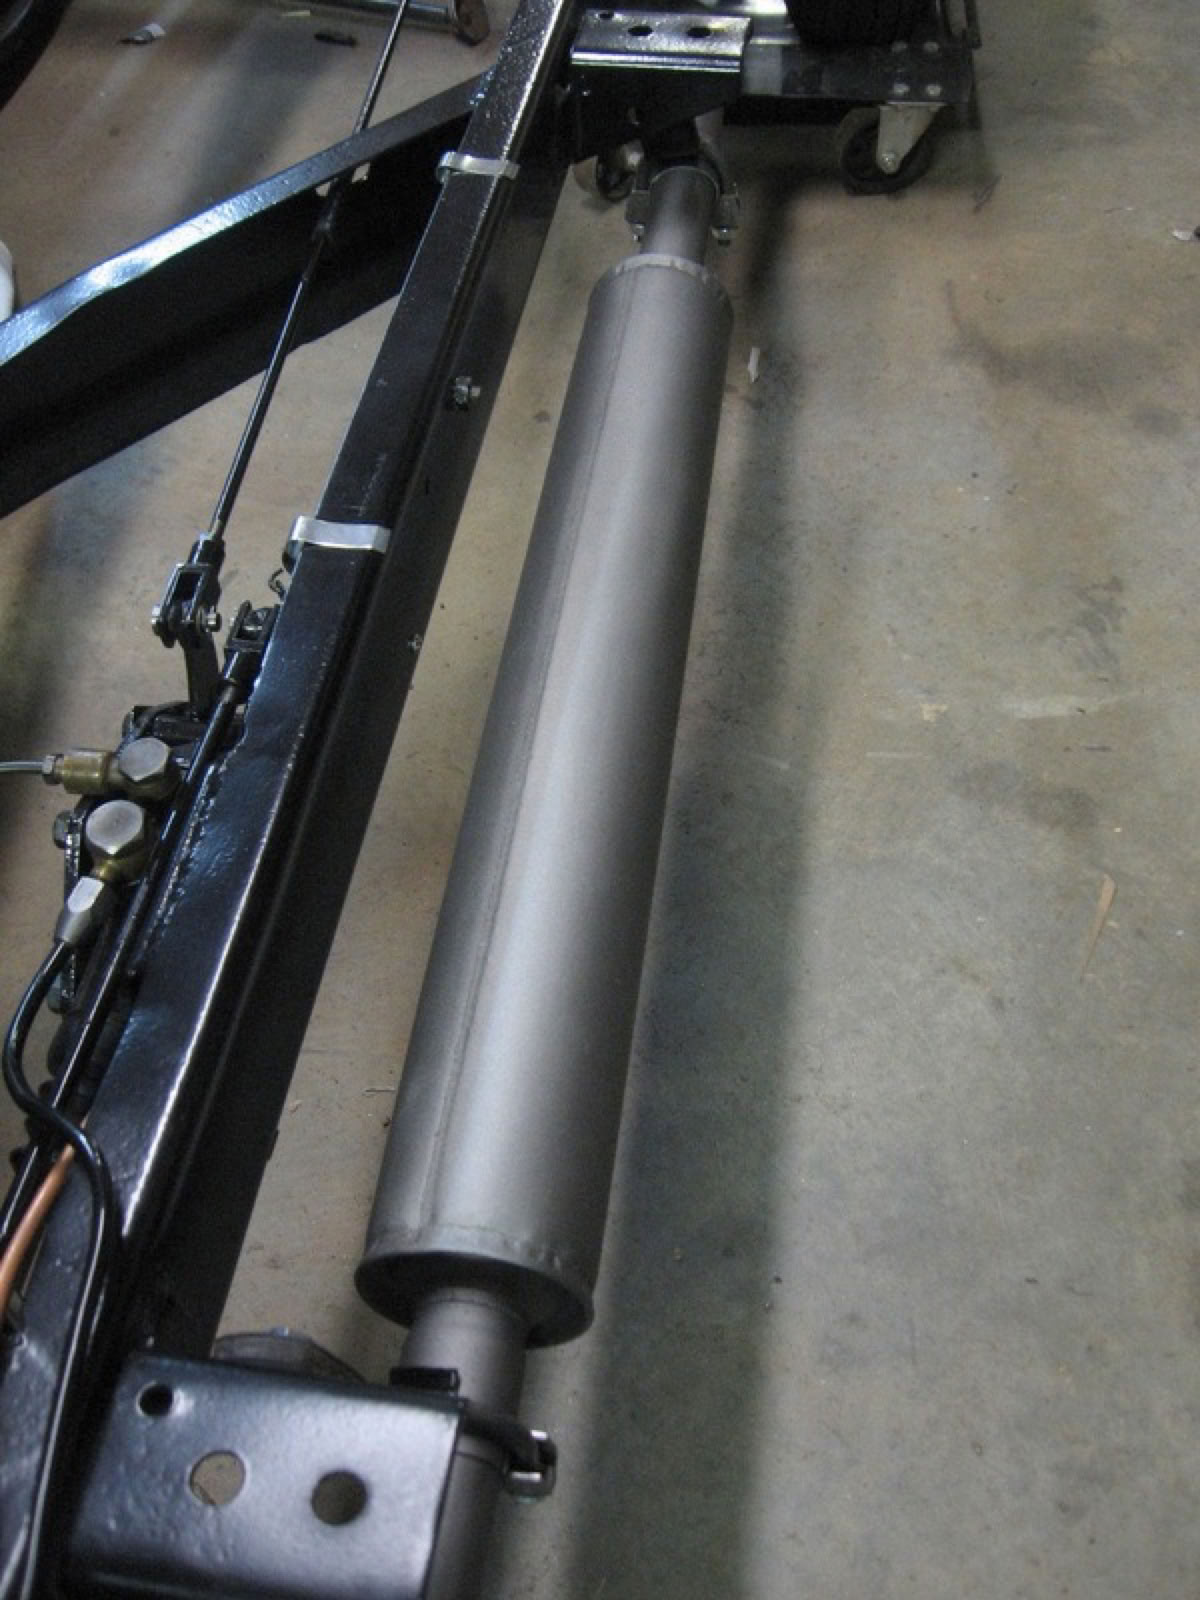
This is a great view to show the location and set-up of the muffler assembly. Fred mounted the system differently to the original, but the installation is sweet!
I acquired mine from Summit Racing. The OEM mounting calls for one single large support clamp in the center of the muffler which attaches to the frame rail. As I can tell, that is the only support between the back of the car and the exhaust manifold. I was a bit uncomfortable with that so I decided to take advantage of the body mount lugs and positioned the exhaust pipe/muffler joints directly under them. The flexible hangers are bolted to the frame and attach to the clamps that secure the muffler to the pipes. This setup seems flexible enough but with a little extra security. I used cheap PVC pipe to make a pattern for the exhaust pipes, using heat to form it where the bends would go. I then took the patterns to a local muffler shop who custom made the front and rear pipes. After checking the fit, cutting them to proper length, and carefully positioning the exhaust manifold flange to the front pipe, I returned to the muffler shop for welding.
It's a Walker 21035.
https://www.summitracing.com/ga/parts/wlk-21035
I believe the moulds created by the late Roadster guru Bill Haverly are in the hands of ASCO in the UK. I think they may have made up a batch. These are fiberglass but look like the original at a distance. Might be worth checking with them via their club site:
http://www.asco.org.uk/index.html
While doing the preparation to get my 4AD registered and driving the first very short runs with it I noticed that the gearbox occasionally sticks to first gear so that it is very hard to get the gear lever away from first. I suspect that it may be due to some excessive play in the gear transfer mechanism. I haven't yet opened the gearbox cover and started diagnosing the problem. Has anyone else had similar problems with the gearbox and any clues what might be the problem?
I fixed it by the rear nut in the square flange to unscrew half a rotation, and again with a cotter pin to secure.
Remove the cardan shaft first.
I have never seen a solution to this problem. My 4AD had the same issue and I thought I was the only with it, didn't know others had it. I drove it that way for 30 years, I just had to remember to always get out of first quickly. One time when I didn't get out of first in time, I had to drive home about 12 miles in first gear, picked all the slow roads of course. I got home and next morning when I went to take the gearbox apart it shifted easily, as a result I always thought it was heat related and I had something to tight in the gearbox, but it never went away.
the adjuster that ron mentioned i cannot find. aprently it is somewhere next to the driveshaft.
i found the adjuster bolt with a locking nut, on the topcover of the gearbox in front of the shifter lever and between the two front nuts, ( of the 6 nuts on the cover)
it adjusts the stroke of the shifter lever to 1. gear.
that means possibly that the "peg" inside the first gear, (and of course the gear wheel), can be adjusted a little bit backwards away from eventual wear on the gear axle, as seen on the photos from Rons topic on removing this "peg".
After taking the gearbox apart, I concluded that the first gear sleeve occasionally moved so much that the spring loaded ball retainers that hold the sleeve in the neutral position when the gear is not on, managed to came out and lock the sleeve in the first gear position.
As a solution I turned a thin spacer ring and installed it on the gearbox axle so that it limits the first gear sleeve movement so that the above does not happen. After this fix the gearbox has functioned perfectly for a couple of years and a several thousand kilometers without sticking on the first.
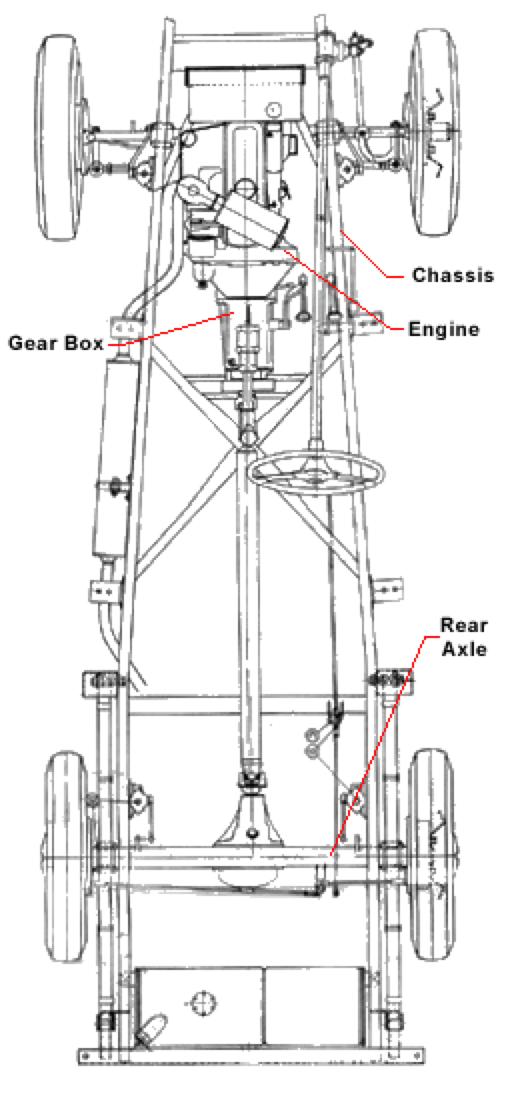
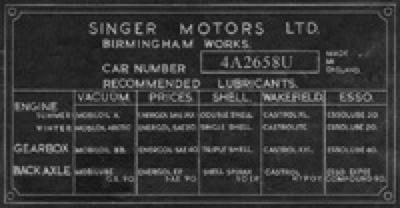
The brass Name and Number plate identifies recommended lubricants, the Company, place of manufacture and the Car Number (eg A1579S). This is the number required for vehicle registration and must match the serial number stamped on the chassis.
You should also find a stamped, oval aluminum disc which identifies the Body Number.

The Name and Number Plate can be found on the side of the bulkhead. The Body Number Tag will be found on the scuttle as noted below.
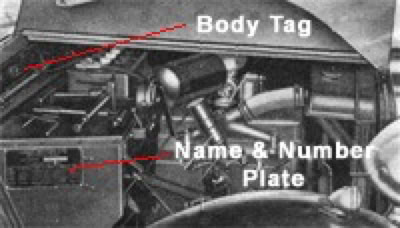
Numbers on the chassis include the Chassis (main side member before the bumper support bracket), Engine (on the offside of the flywheel housing), Gearbox (top face of flange adjoining the clutch housing) and Rear Axle (top of casing).
At my both 4A Singers, the chassis number is stamped on the R-side about 10 cm after the front bumper bolt
4AD Serial number location photos - http://www.singercars.com/4ax/4adserial.html

BRAKES
See Electrical for breakdown diagram of brake master cylinder.
Brake Fluid Article: British Motoring Magazine Spring 2009, p. 26
I believe the front brake cylinders are the same as Austin-Healey 100. Perhaps someone else can verify. I was able to purchase mine new from Moss Motors. When I did my brakes a few years ago I was unable to find new shoes so had mine relined. Was not expensive at all.
I just use DOT 4 brake fluid from NAPA with no issues. Modern seals are pretty forgiving if running basic DOT 3 or 4 fluid.
PARKING BRAKE DETAIL PHOTOS: http://www.guru-group.fi/~kabu/index.php?option=com_joomgallery&func=viewcategory&catid=35&Itemid=80
************
Re: Is it possible to convert rear brakes to Hydraulic?
Postby mikeyr » Wed Apr 27, 2011 10:41 pm
i don't see why not but I question the need. The rear brakes when properly adjusted (the hard part) will easily lock up the rear wheels. It should be fairly simple, I would look for different backing plates for something that was setup with hydraulic brakes to begin with and modify the backing plates to fit the rear axle. I think that would be easier than trying to modify the backing plates to hydraulic. Then a new master cylinder, I would if I was going to that level of modification go with a dual master to separate the brakes. There are even some single master cylinders that would bolt right in as the "style" was used on other Brit cars at the time, slightly larger bore but they should bolt in with minimal mods, however I still would look into a dual for safety. Last item is just a equalizer valve and those are dime-a-dozen, I would probably get the same model as the master cylinders car that i took it from. Rear brakes I would look at Sprites/Midgets as they are about the same size. Dave Green will know which masters would bolt in if you are staying single cylinder but again I would look at Sprite/Midget dual.
Remember that your front brakes are Austin Healey already from the factory so staying in the family should be easy and help convert. By now its should be obvious i thought about it before
but I stayed with mechanical rears once I learned to properly adjust them.
************
Great discussion of master cylinder redo
http://forum.singercars.com/viewtopic.php?f=4&t=584&p=2292&hilit=rear+brakes#p2305
Adjusting Brakes
• Quote
Postby mikeyr » Thu May 15, 2008 3:38 pm
I wrote something up with pictures many years ago for this website, at least a decade ago and I can't find it now.
For starters download this pdf http://www.singercars.com/4ax/motortrader.pdf page 6 has a section on adjusting the brakes. Basically, the procedure is to lock all 4 wheels by adjusting the brake shoes to be against the drum. Then you disconnect the back of the long rod near the rod relay by the axle. You now adjust the master cylinder push rod so that the pin is near the front of the slot in the push rod as the push rod is resting on the cylinder. Now adjust the long rod so that the pin can be put back as you manually pull the relay forward. Readjust the brake shoes and enjoy the drive.
It sounds hard and its hard to explain but it is really easy, can almost do it in my sleep and my car will lock up all 4 wheels.
Mike Rambour.
*******************
Lots of brake parts: https://www.ebay.com/b/Vintage-Car-Truck-Brakes-for-Singer/34199/bn_21468782
Singer Owner November/December 2003
Roadster Repairs Master cylinder overhaul 4AB, 4AC, 4AD Roadster
Ashley Crossland
It started one Saturday earlier this year when we were due to take the 4AC Roadster to a rally the following day. Backing the car out of the garage revealed the fact that there was no brakes. A quick check round to make sure there was fluid in the reservoir made me reach the conclusion that the master cylinder had "gone". So I didn't take the car to get it filled up with petrol, neither did I wash and polish it, but carefully returned it to the garage. We went to the rally the next day in a different car! I don't think that there is anything suspicious about the brake master cylinder having gone. Again it's down to the rubber seals having been in the cylinder for over 20 years. However, I should have expected a problem since I have previously mentioned in the Singer Owner about rubber components failing. Naturally current materials are an improvement so we don't necessarily see the same problems with our current cars. Also with hindsight I had changed some seals in the front wheel cylinders and it's easy to see that bleeding the brakes would have pushed the master cylinder onto crud that it's never touched before. The new wheel cylinder rubber seals were done for the MOT, but afterwards the master cylinder was then living on borrowed time.
Now before I describe the overhaul of a Roadster master cylinder can I say that the general advice on such brake components is to fit a complete unit and not to fit a seal kit. This is a far safer proposition, but I do accept that for our Roadsters there is little likelihood of getting a new master cylinder and if it's old stock the rubbers in it might be 50 years old.
Getting at the Roadster master cylinder is quite easy. The car doesn't need jacking up and access is quite simple from above.
First of all, tie a bit of string between the drivers door handle and a side lamp so that the door is held open at a convenient angle. If the seat is over the driver's side front floorboards, slide it back, but there is no reason to remove the seat. Roll back the carpet and undo the screws holding down the front drivers side floorboard and then remove same. The master cylinder is now visible.
Slacken the pipe ends and let the hydraulic fluid drip into a suitable container placed underneath. Slacken off the nuts - note do not disturb the union bolts.
Three long bolts secure the master cylinder to the side of the chassis. Remove these three bolts, taking hold of the master cylinder as it becomes loose. Fold back the rubber concertina dust cover to expose the spring clip that holds the pushrod
Into the end of the master cylinder. Remove the circlip with some thin-nosed pliers, not circlip pliers. If the seals have little grip, the spring in the master cylinder may push out the piston. Take hold of the master cylinder and take your bench.
To fit new seals in the master cylinder, follow the instructions in the kit. However, one important point to take note of is the removal of the large end nut. This is screwed onto the body of the master cylinder and makes a pressure tight seal on its flanged face with a copper washer. It is very important not to distort this flanged face of the nut and therefore to remove the nut you should use the correct fitting socket or ring spanner. I would not advise using an open-ended spanner, nor stillsons, nor clamping it in the jaws of a vice. Anyway 11/16" BSW is the size.
In an old kit, Girling kindly provided a list of cars. Although our beloved Singer Roadster may only exist in limited numbers, there are some more massed produced cars using this kit and therefore it has a chance of being available, one would hope, for some time to come.
The master cylinder kit is Girling SP1211/1 and OK, there are probably fewer Allards and AC 2 litres about than Singer Roadsters, but Austin A40, A70, A90, Ford Consul and Zephyr MK1, Jaguar VII and VIII with Rover 60 & 75's should keep us going!
However, back to re-assembly of our master cylinder. One of my pet subjects is the subject of copper washers and how they start off as soft copper, but get work hardened after being tightened up in a joint. Thus they are not as effective in sealing if they have been used before. New kits come complete with new copper washers and you must always use a new copper washer for the big end nut. Obviously do not use new washers in "trail assemblies".
The rest is straightforward, although one tricky bit is the joining back of the master cylinder to the push-rod. Make sure that the circlip is correctly in place and properly seated in its groove. Pull and tug on the pushrod to make sure it won't come out. When you are satisfied line up the master cylinder with the holes on the chassis and assemble the side plate with two bolts through the master cylinder and one bolt through the spacer tube. Incidentally, this spacer tube is important!
The rest of the re-assembly is straightforward. Screw up the hydraulic pipes, fill with hydraulic brake fluid and bleed the front brakes. Check the entire system for fluid leaks and test the brakes. If you have any doubts or problems, then get it sorted professionally.
The moral of the story? Well I suppose it has to be that rubber compounds have improved, but we are faced with the fact that 20 years ago, rubbers were only good for a 20 years life. If you are keeping rubber parts "in stock" for the future, there are recommendations that you should follow, like keeping them cool; dry, free from grease and out of the light etc., undistorted. The recommendations can be found by reference to them, not here.
• side curtains
• carpets
• Tools
• Manufacturing plate
• Hood (later article on Fitting of the Hood)
• Chassis
• Brightwork (chrome)
• Electrical
• Wiper Motor
• Engine
• Front End Panels
• Fuel System
• Interior Details
• Primer Paint
• Radiator Frame (from SCRATCH!!)
• Seats
• Side Grilles
• Steering Wheel
• Wheels/Tyres
• Wheel nut fabrication
************************
I forgot to mention the second tip that I picked up during the restoration period. Don't try to get the doors to fit like a Rolls-Royce - they won't. The problem is the metal cups in the center of the hinges. Drill them out to a larger size and fit stronger through bolts. I almost ended up in a mental home trying to get the doors to hang right. Now I just lift them on and off the lock - when the judges are not looking. But do make sure that your side, where the driving wheel is located, has a strong bolt - on second thoughts make that two. If you insist you can put the same thing on the passenger side, but it's not mandatory!