2018
• 20180105 - Breakthrough with bended pipe, more rubber
◦ After tearing the garage apart once again, I found part #77 of the Singer (oil pipe) in a wooden box of extra VW, Honda, MG and even parts scrounged from the dump! How could such essential parts get away from me??? Delivered with a smile to Brad who will make a special place for the Singer in his 2nd bay. Several other items found in the wooden box will have saved extra trips to First Rate Auto!
◦ Joined 6-7 new pieces to the rubber cowl which fits over the gearbox. Loving that Flex Seal!
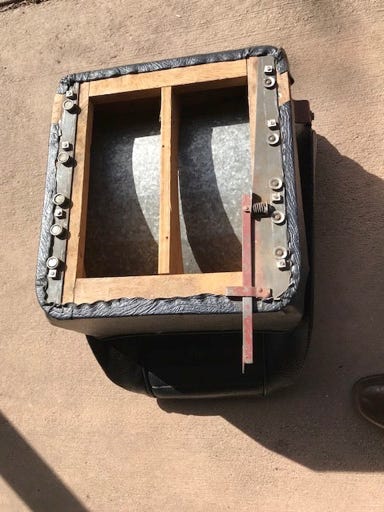
• 20180106 - Scuttle wood matching, windscreen, rubber
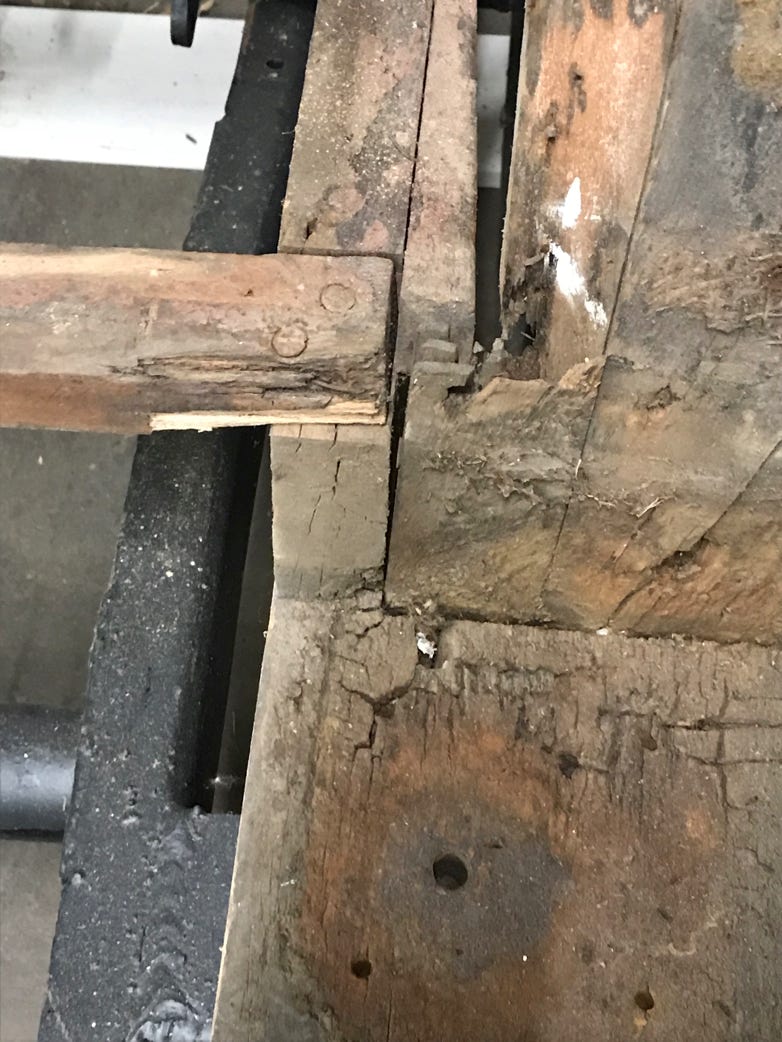
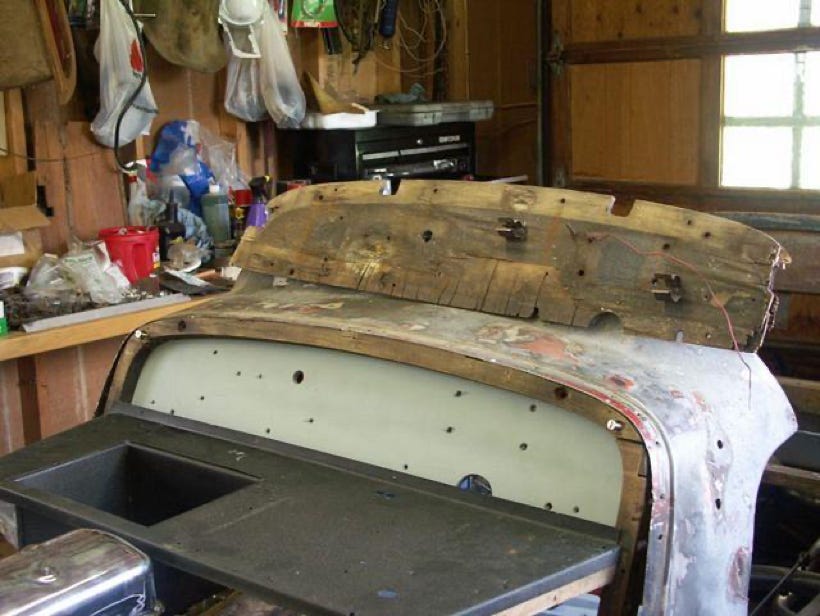
◦ Matched many pair of wood members used to support the scuttle. A couple will have to be completely remade from oak or ash, others will work with one end or the other spliced together to connect to other pieces. I fear even more pieces will have to be removed to get to the wood screws coming in from the back side. I still need to contact Greg at the Trolley barn for advice on using fiberglass and adhesives. I went ahead and used Elmers and clamps on a couple of pieces.
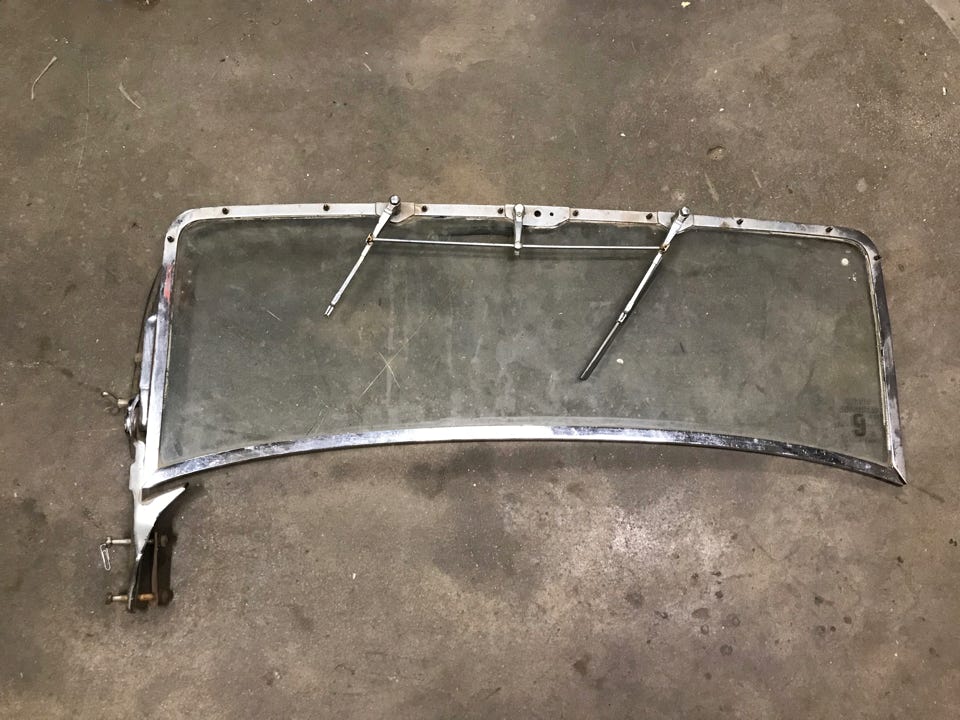
◦ Took the windscreen apart, some internal pieces hopelessly rusted, had to drill out 8 screws which hold the glass in the chrome frame.
◦ Good news: the windscreen will not have to be rechromed.
◦ I disassembled, greased and reassembled the triple wiper mechanism. I can't remember, but I think the original wipers were vacuum driven. I may have to seal off the vacuum delivery port and revert to an electric wiper motor. That makes me wonder if I should stick with a positive ground system or just rewire the whole car to negative ground as I did with the MG.
◦ Fiberglassed and rubberized the bottom of the gearbox cowl.
• 20180109 - Greg Roberts - Keith Roberts - Wood
◦ Called Dave Lippincott, got number for Greg Roberts (wood expert from Trolley Barn) 266-4701. He readily answered my questions…WAY over my head! i.e. he recommends I buy ash from Heidler Hardwood (est. Chicago 1896) but they can't ship ash because of the emerald ash borer which has now moved as far as Boulder, CO and threatens to destroy ALL ash trees. Heidler, however, has their own kiln and can ship kiln-dried lumber. He recommends resorcinal glue to laminate planks to make up the thickness I need. For hardware, he recommends Jamestown (who is a "chandler" [boat builder]) for waterproof British supplies. For fasteners, he recommends phosphor bronze screws from the Bolt People in Boston. He recommends only Fuller tapered drill bits for pilot holes in ash. (Jesus Maria!!). He went on and on about welded boilers vs. riveted boilers in steam locomotives, British woodworkers able to make curved staircases and German woodworkers (15 years as apprentices) able only to make perfect "shrunks", Japanese masters not sanding interior studs of temples, rather using EXTREMELY sharp chisels to smooth the studs which would never expose follicles and thus encourage rot. Then rivets in steam locomotive boilers, yada, yada, yada…. The guy is a fountain of information so far over my head as to be stupefying!!
◦ Called Keith Roberts - of course he has a band saw and more than willing for me or he to use it. Recommends Titebond glue, zinc screws, masonite templates, etc. Whew! Decompression…
• 20180110 - Brad, Nick, Singer grill
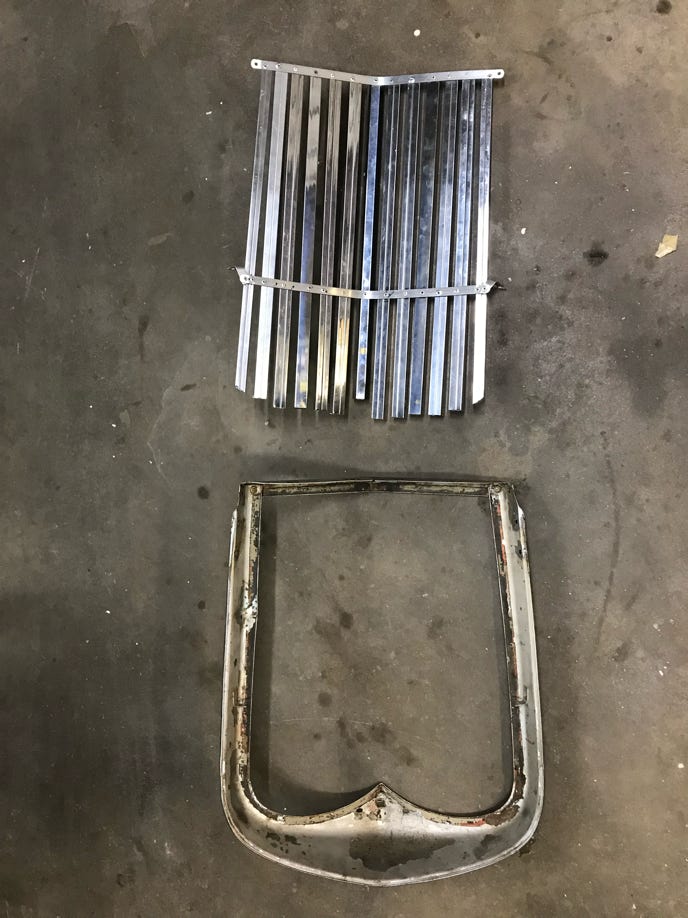
◦ Went to First Rate to measure radiator shell on radiator frame. Brought radiator home. Brad and Nick had moved the Singer into its tiny sandwich piece of real estate. Brad had the timing chains on, but I had to find the sump oil plate for him. Progress is slow, but…
◦ I finished pop riveting all 13 vertical grill bars and insured all fit inside the radiator shell. Brad has a guy who can rechrome, but he wants me to work thru First Rate (hmmm). I told him I'd send him photos to pass on for a bid to match the one I hope to get from Tiny in Pueblo.
• 20180112 - Wheel spinning, Jim Goodwin, rotten wood
◦ The complexity of the wood fixing/replacing was just overwhelming today. Cath finally came down and offered some advice: "call someone". I did call Jim Goodwin who offered to come over, but never showed up. I found several more puzzle pieces for the scuttle and later brought in the tub. Clamped several more cross pieces for stability.
◦ Charged the batteries in the G11 to have on hand to photograph all details and give myself a record should the interruptions become lengthy and the memory fade.
◦ Consolidated photos in the Singer Rebuild folder on the desktop of the iMac by section: i.e. Engine, Body, Suspension, etc. That then extended to diagrams and even descriptions. I wouldn't be surprised if this form of cataloging ended up swallowing up all facets of the rebuild.
• 20180113 - Keith, Plugger, CO lumber, Lowes,
◦ Went to CO Lumber looking for Ash. I'm hoping an 8' x 2" x 6" for $40+ will do the job. If not, they have 2" x 8" x 8 and 10' planks for $5.50/bd ft.
◦ On the NASOC web forum I found the cleverest solution for the rotten holes caused by rusty wood screws. Use a tapered bit called the "plugger" to drill negative cones where the screws were. Then take a 3/8" dowel and sharpen it in a pencil sharpener. It will be the perfect positive cone when glued into place! I ordered a set of tapered bits and Titebond Ultimate just now.
◦ Went to see Keith who has offered his well-appointed shop to me for the wood restoration, also his truck for hauling things. I helped Jane with an idea on how to organize her many cords.
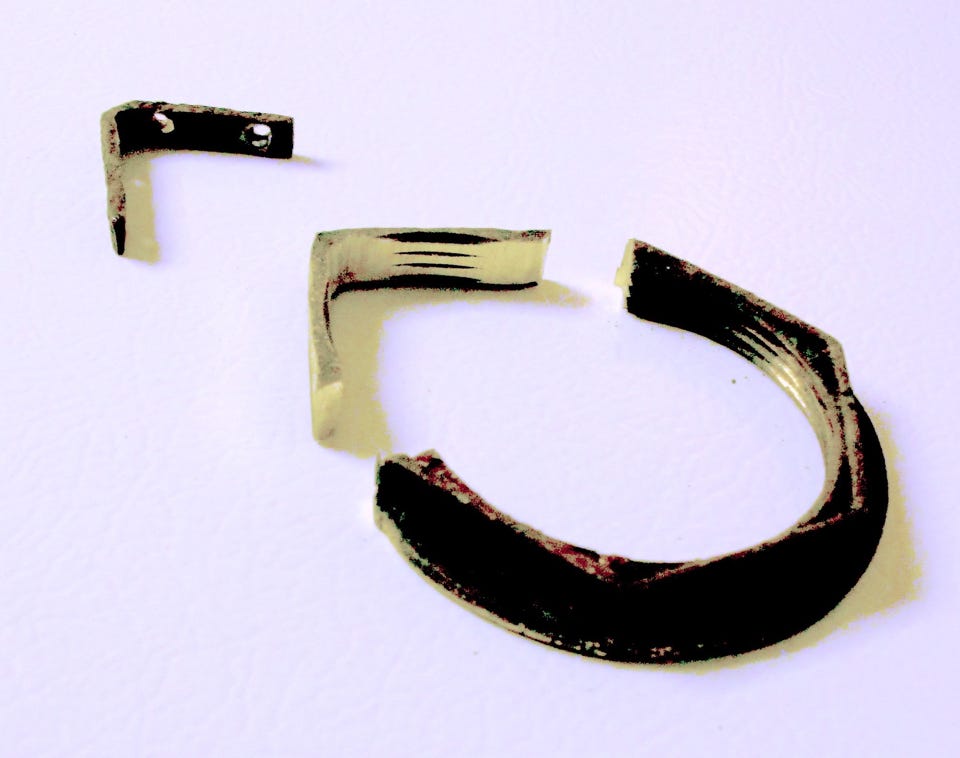
◦ I'm using a piece of bronze plumbing fitting to make the two non-rust interior angle brackets at the bottom sides of the windscreen.
• 20180116 - Ash, slotted screws
◦ Bought 8+ bd. ft. ash from CO lumber
◦ Discovered slotted screws are rare. Finally found a fair assortment at Ace at Uintah and Circle
◦ Decided to go with orig. steel screws and nails instead of stainless. As Goodwin mentioned, this car will be in a garage for the next 100 years and in no danger of the rust and rot of it's previous 20 years before I bought it.
• 20180117 - Brad, water pump, oak
◦ Brad called missing the housing behind the water pump. Miraculously (again) I found it in my box of "couldn't-possibly-be-Singer" parts. I also showed him the location of two pressed steel panel in the bottom of the engine.
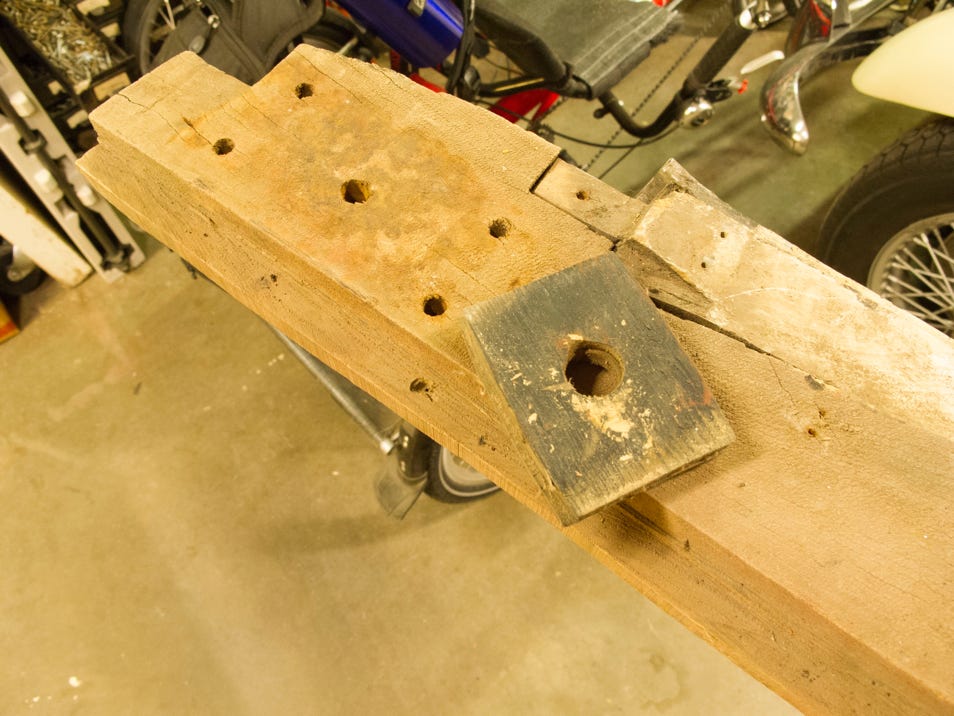
◦ Replaced a very rotten wood piece near the rear passenger wheel well with oak and its tapered shim with cherry.
◦ My tapered drill bits and glue supposedly were delivered by UPS last night, however, they were not on the porch. Amazon refunded money this morning and had me reorder. The tapered "pluggers" arrived by USPS this afternoon.
• 20180118 - Metal pan under back seat
◦ Guessing that the metal pan under back seat fit across the piece I just cut out of oak to replace the totally rotten piece. Changed the whole geometry of the car! Glad I used it. Now things start to fit. Using the router was thrilling, 20+ year delay. It worked, however.
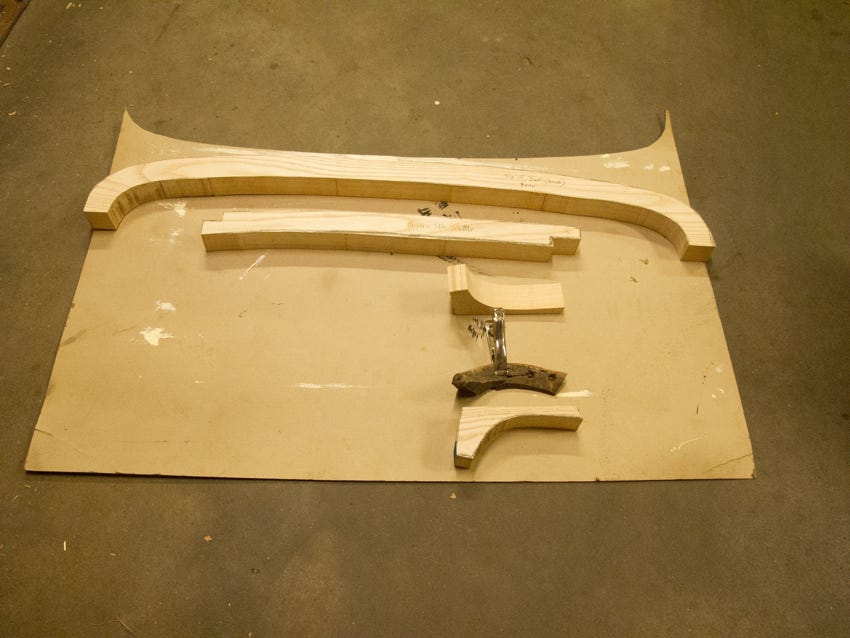
◦ Traced on cd bd the upper rear seat/top of boot piece of rotten wood. Transferred to Ash ready for the band saw.
◦ Bought some expensive wood screws at Ace Hdwr (the only place in town selling slotted wood screws).
• 20180119 - Restore for slotted screws
◦ Cked Brad. No real progress.
◦ Brought home some metal braces
◦ Traced rotten scuttle pieces on the ash.
◦ Went to Restore and bought 3 lbs. of slotted wood screws for $1/lb.!
◦ Bought flashing for under rear fender wells.
• 20180120 - Keith, band saw
◦ Used table saw and band saw to cut out 4 pieces of ash wooden frame members
◦ Probably allowed too much slop, but rather safe than sorry.
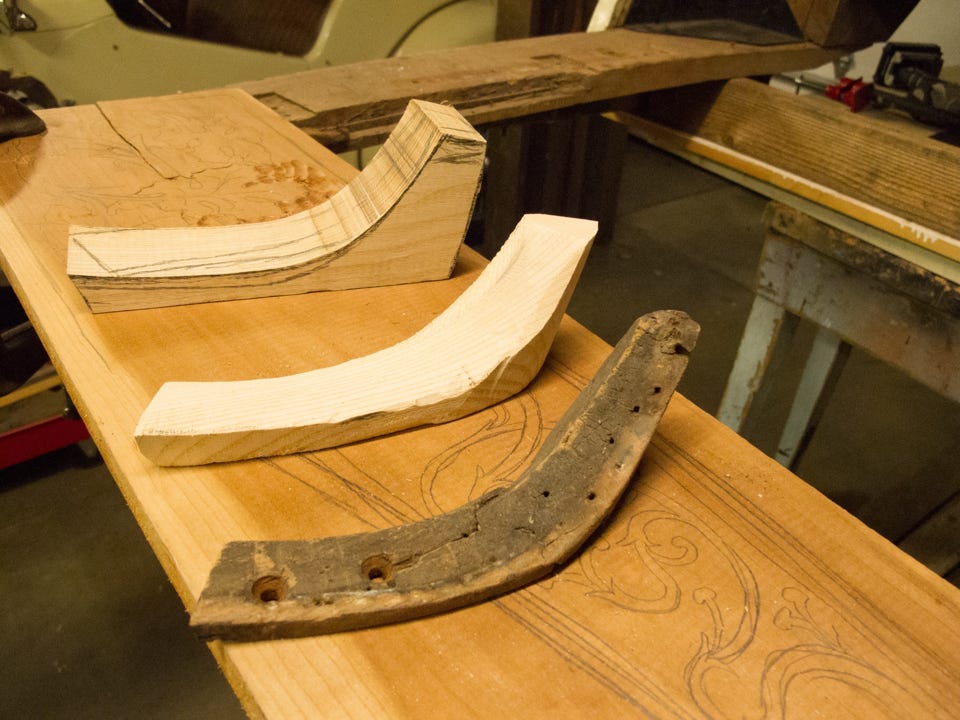
• 20180121 - Not perfect curved rear piece
◦ Tried to form the multi-curved small joining piece at the back of the rear seat/top of the boot. It might still work, but the original must have been fashioned from larger stock. Kinda bummed about the results.
◦ Did make the lap seam for the cross piece which holds the pan under the rear seat
• 20180122 - Brad, wood fitting
◦ Some, but not a lot of progress on the engine. Brought home some metal pieces and the door hinges.
◦ Installed the cross piece mentioned above. Had to release clamps and rearrange the geometry of wooden frame. Then got things too tight for the pan to fit.
◦ Had to remove the oak pieces and plane them down about 1/8". Tight fit now.
• 20180123 - Recreated wooden door post
◦ Today was golden and very physical - almost all wood shaping done with hand tools
◦ It fits and is beautiful!!!
◦ Shoulders very sore.
• 20180124 - Brad engine progress, door hinges
◦ Worried about doors fitting the new post, I went to Brad to get door hardware.
◦ He has made quite a bit of progress on the engine: water pump bracket studs shiny but not fastened. Inside of bracket very rusty. Head is on as well as valve cover and oil pan, exhaust manifold.
◦ I fitted door hinges. Ingenious system, but loosey goosey. Missing 1/2 of the pair of hinge for the boot. It must be here somewhere!
◦ Appears Bruce started to redo wood starting with the boot door using angle brackets and oak. Not a great job, but seems strong but incomplete.
◦ Soaked windscreen and boot hardware in Naval Jelly, rethreaded bolts and soaked in WD-40 for both.
• 20180126 - Metal stabilizing pieces for scuttle
◦ Fastened lower connecting metal braces to the door supports.
◦ Also the battery box table and lower abdominal stamped metal piece which now defines the width of the scuttle.
◦ Marked pieces to be band sawed tomorrow
• 20180127 - Keith band saw, upper scuttle
◦ Used Keith's band saw to cut firewall and upper support pieces for the scuttle
◦ Glued front and back pieces of this upper support
• 20180128 - Scuttle wood
◦ Formed the upper scuttle arch on passenger side.
◦ Mid upper support finished and fitted (will need shims to meet aluminum skin but is now flush at rear to accept firewall plywood. Urethane old and new wood parts
• 20180130 - Terrible Day
◦ Exhausted and feel no real progress despite fitting and refitting lots of wooden parts.
◦ Dropped trafficator switch which shattered (made of bakelite!).
◦ Emailed Gregory in England who responded he had no more.
◦ Resanded several parts back to bare wood.
• 20100131 - Screwed scuttle together
◦ Made another upper part for the scuttle
◦ On reassembly everything seemed too tight
◦ Bored holes for final assembly but have it held together with a minimum of screws (I know I'll have to take it apart multiple times again.
◦ Thought seriously about mounting scuttle on the front of the tub, but…
• I really need the frame below to bolt through
• Wouldn't this subassembly be much easier for the body shop/painters to work on if it was separate?
• Made a list of Yelp's highest rated paint and body shops to compare with what locals tell me.
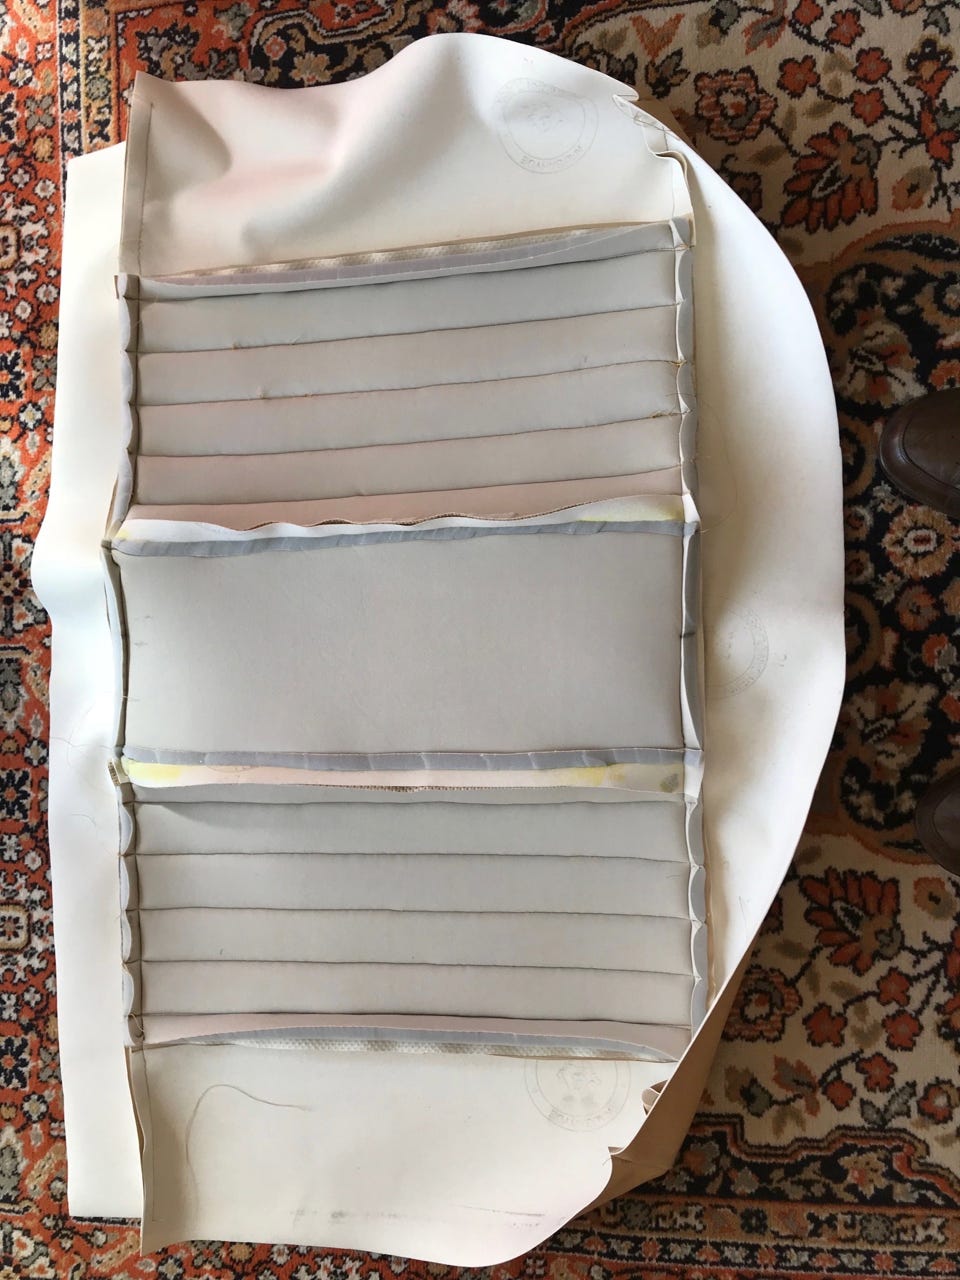
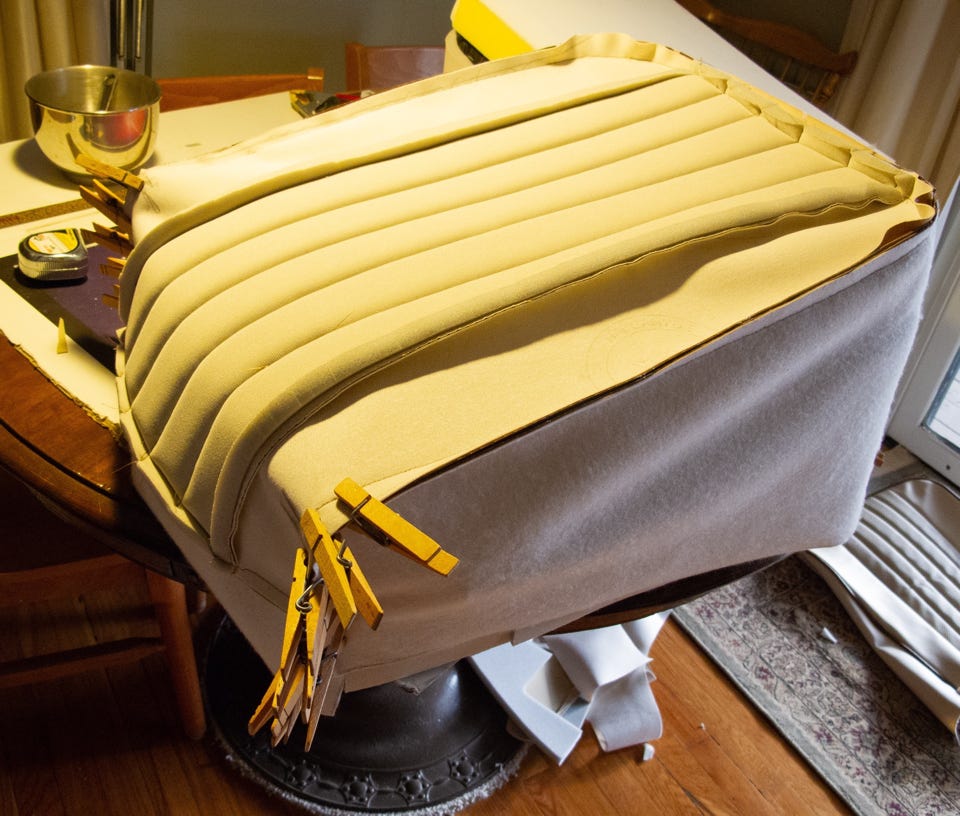
• 20180207 - Upholstery panels, Brad, piping
◦ Several days getting supplies and sewing the piping necessary for the interior panels/seats and the exterior fitting of the fenders and running boards.
◦ 5/16" piping for the interior; 3/8" for the exterior.
◦ Process went surprisingly smoothly using the Pfaff sewing machine.
◦ Fingers a bit stiff and sore.
• 20180212 - Brad, nuts, missing water housing
◦ Brad called. Missing nuts for manifold, oil pan, valve cover
◦ Took multiple jars and trays of possibilities, but no fit
◦ Tried SAE, Metric and BSW taps and dies…no cigar
◦ Came home and found two possible water housings
• 20180213 - Nuts, Rechroming
◦ Called Moss about nuts. They ref: www.britishfasteners.com
◦ Talked to John at britishfasteners.com. He had several options for the manifold nuts. Think I will opt for the brass ones.
◦ Seems the Singer used British Standard Fine nuts and bolts, not British Standard Whitworth!
◦ Ordered another tap and die set from Amazon!
◦ Delivered news and water outlet pipe housing to Brad who had another parts list for me to chase: oil filter, gaskets for exhaust manifold, more nuts and bolts
◦ We discussed placement of a thermostat. The Singer drawing seemed to indicate the brass cylindrical thermostat I had was placed in the head behind the water pump. Brad and I looked, but that seemed impossible. He said running without a thermostat would not make that much difference. The engine would just not be able to reach max. temperature faster.
◦ Brad's source for chroming ships work to Kansas. Said the radiator shell would be $450 + $45 shipping each way + crating fee, 8-10 weeks est.
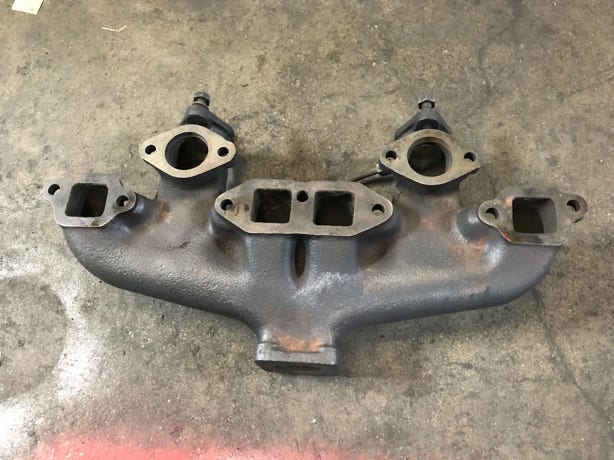
• 20180215 - Nuts, Brad, KIP Motors gasket, oil filter
◦ Got email from Dave Green that he "may have some nuts"
◦ Put in my order for all nuts and bolt to www.britishfasteners.com , 3 day delivery USPS
◦ Called KIP Motors, talked to Brandon, ordered whole manifold gasket set, paper and metal, custom made, one off for around $65. Decent human, decent price
◦ Took oil filter info (O'reilly) to Brad, discussed nuts, took him the BSF tap and die set. He confirmed we needed 5/16" x 22 BSF.
◦ Be sure and return BSW wrenches and sockets when the nuts arrive.
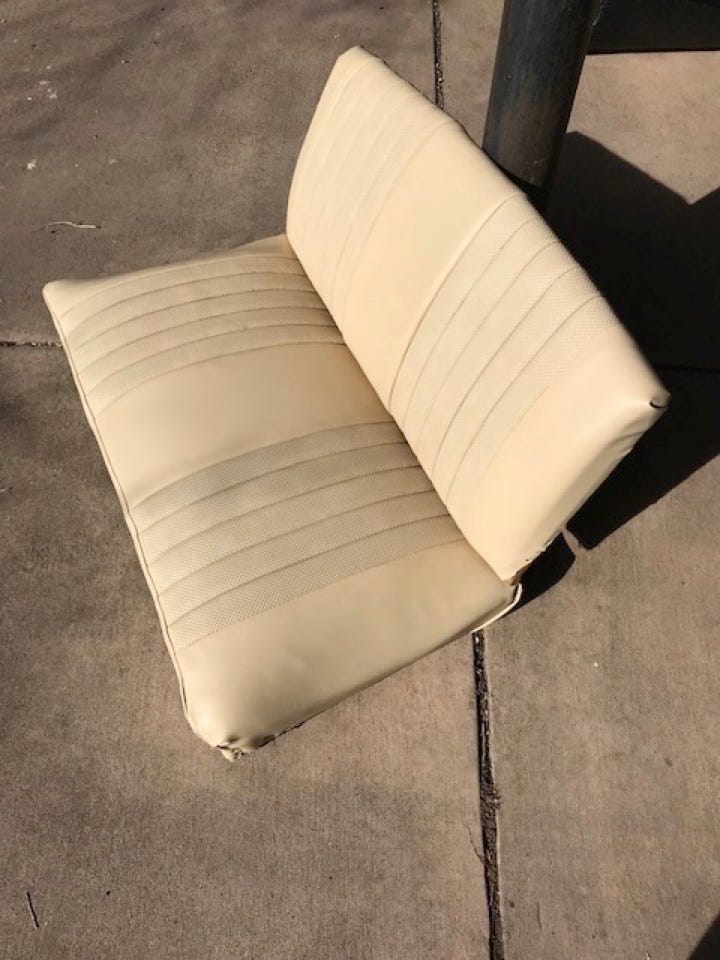
• 20180217 - Back Seat
◦ Removed cover from back seat and rest.
◦ Lots of rubberized hair, dirt and cheap turquoise vinyl.
◦ Started on seat with anchoring no sag springs and painting frame and springs with rustoleum.
◦ Found a scrap of the breathable vinyl that will fit seat.
• 20180223 - Timberline Upholstery
◦ Bought foam, polyscrim and cement from Debbie. Great service and close.
• 20180224 - Eddie Shvartzman, Cowan Singer, missing chrome vents
◦ Home in north Black Forest
◦ Amazing car collection $$$
◦ George's Singer looks pretty good, took some photos, bad lighting
◦ Eddie claims KIP gaskets will not work. Said he had work done in Yuma, CO. Overall, pretty disparaging about Singer, however, he is having some REAL financial issues.
◦ Can't find the chrome vents on either side of my engine panels!
◦ See photos in George Cowan folder
• 20180225 - MG Dinner, Castle Rock
◦ Talked at some length with Bill Bollendonk about Singer
• He recommends not putting flashing under wheel wells, rather to clean up, sand and coat with spar varnish, dry and coat a couple of times with Rustoleum black.
• He was also suspicious that I wouldn't be able to replace wood without taking aluminum shell completely off.
• He claims there is no one in Colorado capable of quality rechroming. He sends his stuff to Texas. Was willing to share source and offer lots of help and advice.
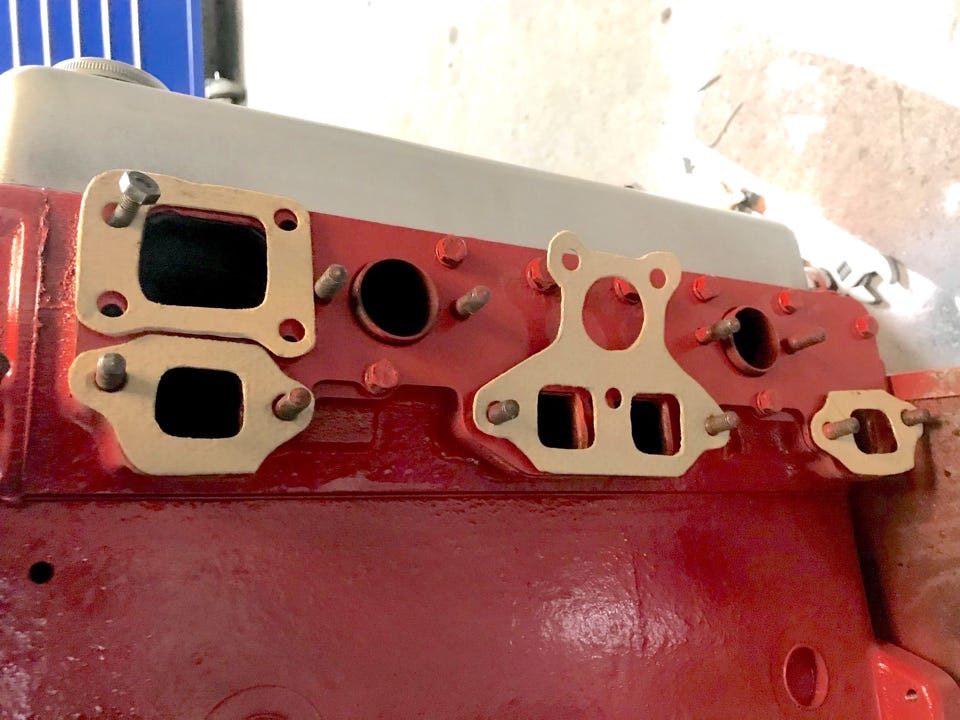
• 20180226 - Rechroming, Yuma, gaskets
◦ Took KIP gaskets to Brad.
• They fit just fine, however…
• The two diamond-shaped round holed intake manifold gaskets are missing. (also, I can't find the original one I had last week).
• Called KIP Motors, reported the missing intake gaskets. Guy there said no problem, he'd send me a pair right away!
◦ Quality Plating, Yuma, CO, (970) 848-2065, 199 W 9th Ave, Yuma, CO 80759. Called Lowell and emailed him photos of the radiator shell for an estimate.
◦ Sent Tiny in Pueblo a THIRD email with photos as nudge for an estimate.
• 20180227 - Tiny, Lowell, chrome
◦ Heard from Tiny: $450-550 for shell; $150-175 for the top
◦ Lowell's price: $500-600 + $75 for the top
◦ Brad's contact: $450 + $90 shipping for the shell
• 20180225 - MG Dinner, Castle Rock
◦ Talked at some length with Bill Bollendonk about Singer
• He recommends not putting flashing under wheel wells, rather to clean up, sand and coat with spar varnish, dry and coat a couple of times with Rustoleum black.
• He was also suspicious that I wouldn't be able to replace wood without taking aluminum shell completely off.
• He claims there is no one in Colorado capable of quality rechroming. He sends his stuff to Texas. Was willing to share source and offer lots of help and advice.
• 20180226 - Rechroming, Yuma, gaskets
◦ Took KIP gaskets to Brad.
• They fit just fine, however…
• The two diamond-shaped round holed intake manifold gaskets are missing. (also, I can't find the original one I had last week).
• Called KIP Motors, reported the missing intake gaskets. Guy there said no problem, he'd send me a pair right away!
◦ Quality Plating, Yuma, CO, (970) 848-2065, 199 W 9th Ave, Yuma, CO 80759. Called Lowell and emailed him photos of the radiator shell for an estimate.
◦ Sent Tiny in Pueblo a THIRD email with photos as nudge for an estimate.
• 20180227 - Tiny, Lowell, chrome
◦ Heard from Tiny: $450-550 for shell; $150-175 for the top
◦ Lowell's price: $500-600 + $75 for the top
◦ Brad's contact: $450 + $90 shipping for the shell
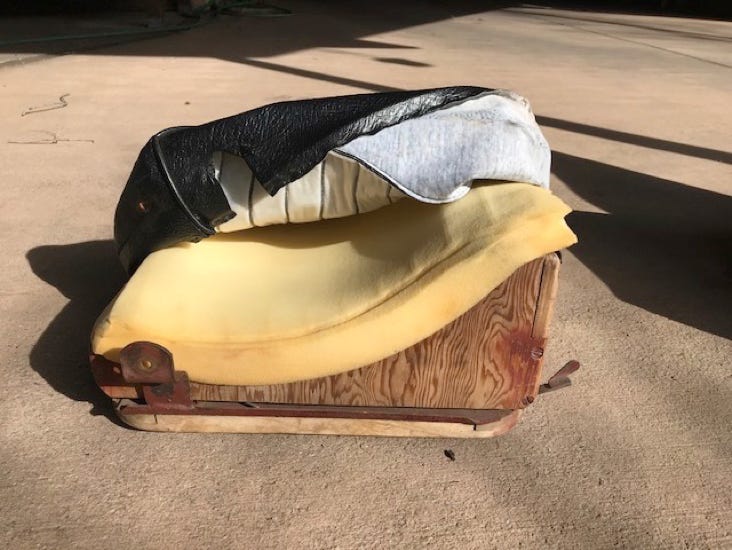
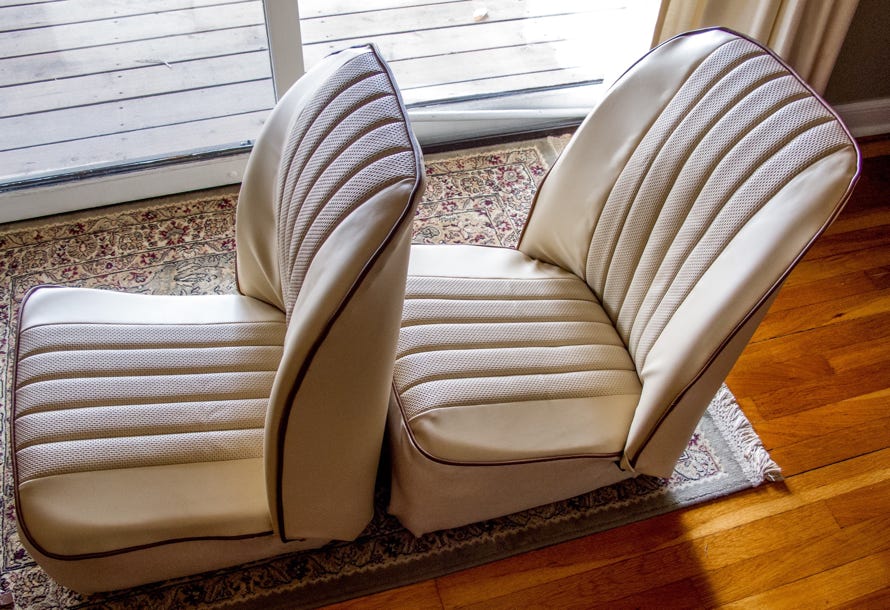
• 20180304 - Upholstery
◦ Spent 2-3 days doing the back seat in tan vinyl
◦ Can't imagine the no-sag springs are original.
◦ Got materials Timberline Upholstery on Stone Ave.
• 20180306 - Gaskets
◦ Couldn't get KIP motors to respond last week, so called Brandon again. He couldn't understand the problem and requested photos.
◦ Went to Brad's, took photos, sent them to Kip
• 20180307 - Gaskets, Bucket Seats
◦ Got the response from Brandon at KIP - he sent the wrong gaskets. They were for a single carb Singer. He will send the intake manifold gaskets soonest.
◦ Upholstery - Buckets
• Since machine is set up, decided to redo bucket seats
• Searched NASOC and Pekka. All Singer front seats back to 1928 seem to have springs in the bottom of the front seats. BTW, Pekka has great double section on how he rebuilt them. All 7 sections: http://www.guru-group.fi/~kabu/index.php option=com_joomgallery&func=viewcategory&catid=17&startpage=2&Itemid=61#category
• Timberline:
▪ Took front and back seats to Timberline. He is certain the galvanized design is original even though he'd never seen anything like it. If I want more comfort, he suggests (in order) Replace foam with high-density equivalent and cover. Or Pull galvanized, dip the front plywood slightly and weave elastic bands back and forth, cover with 2" foam, cover.
• He had no idea where I could get small springs to fit in that small area.
• Brad:
▪ Took the bunch to Brad. He, too, was flummoxed.
▪ He favored dipping the front edge and using thicker foam.
• 20180308 - Elastibelt
◦ Called several salvage yards and automotive upholstery shops. NO SPRINGS available. Web has sources for new ones at $3-4/ea. which would have to be tied up, clipped to rims etc. Way too much work for a rookie.
◦ Decided to go with the elastibelt plan.
• Quizzed a guy at Timberline about weaving the webbing and how to fasten it
• He didn't think my dip in the front was necessary…I may stubbornly do it anyway!
• Bought $92 more supplies incl. a pair of $25 chunks of high-density foam and another yard of polyscrim.
• 20180325 - Grandkids, Neal
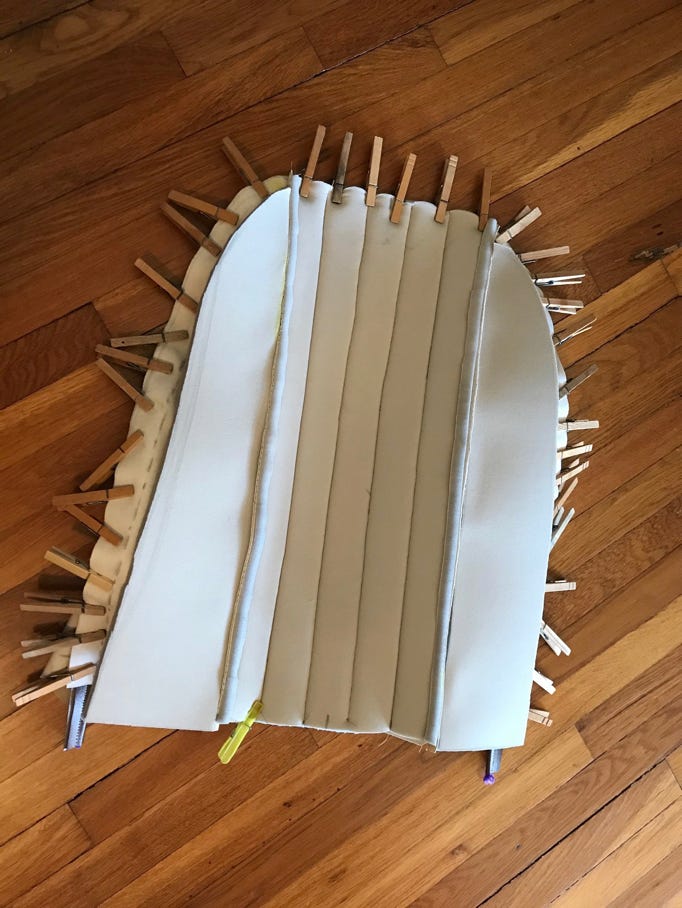
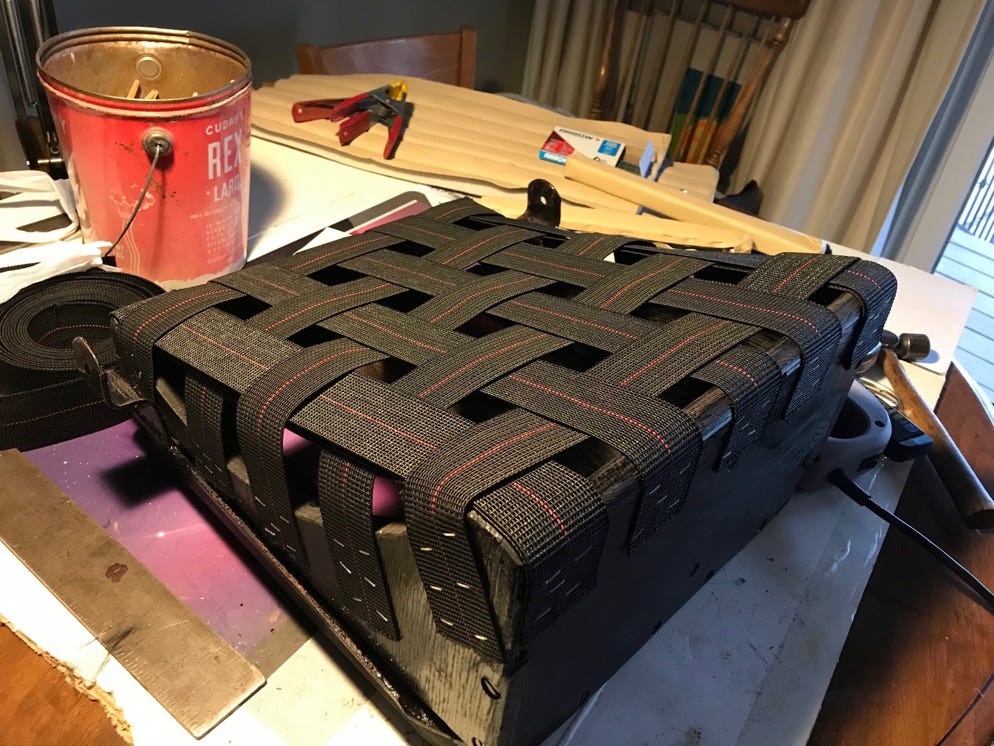
◦ By the time they arrived I had cut and basted the upright backs to the buckets with the channeled centers, wings, piping and rear cover. That way I could turn it inside out to check the accuracy of my measurements. Sewed a bottom piece to the above to make sure I had enough to stretch and staple.
◦ In addition, I'd bought an Arrow power stapler, had decided to double the outer webs to make the over-and-under weaving come out even.
◦ Naturally, I figured the Elastibelt too closely and had to return for two more yards.
◦ Everything went well with the web decking and the kids had a good time with their final web stapling.
◦ Neal suggested blocks of ash at the bottom front of the laminated fender wells. Good call. Then sanding and a good coat of black Rustoleum before Bondo applied to large cracks and holes. More sanding.
◦ Despite Bill Bollendonk's admonitions, I am then going to slip the flashing under the outer aluminum lip, line the outer wheel well, cut a million tabs on the inner surface, bend the galvanized around the inner edge and fasten the whole thing with the inner sheet metal wheel well piece.
• 20180407 - Upholstery End, Nuts, Timing Chain Spring, hydraulic brakes
• After several setbacks, I finished the bucket seats.
• Call from Brad that I'm missing two nuts for valve cover and that the bolt I ordered for the oil pan were too long by about 5/16". Now checking with British Fasteners to see if the 1/2" bolts have the same thread pattern. At $1/ea. I may order new bolts or may just cut off the ones I have.
• The more troubling problem is a missing spring for the chain tensioner. I'll take the springs I have and also recheck all cans of small parts at Brad's.
• Brad agrees we should fit the rear with hydraulic brakes.
• 20180409 - Chain tensioner, hydraulic brakes, new nuts
◦ Found two really stiff steel springs for chain tensioner that fit. Brad thought these perhaps too stiff. We went with a new spring with fair compression. Circlip channel worn. I may cut it deeper with jeweler's saw, but think it's a moot point since the cotter pin surely will prevent the piston from being sucked into the timing chain area.
◦ Brad having a bad day with rusty parts on another car. Shop is a mess. I'm a bit worried.
◦ Email to Martin Willis:
In addition, I’d like to talk to you about the feasibility of me removing the mechanical rear brakes from my Singer and replacing them with hydraulics. Some in the Singer club talk of using backing plates wheel cylinders and master cylinder from an Austin Healey Sprite or Midget since the front brakes on the Singer apparently were made by AH. I can’t find anyone who has actually done it, however, and I can't locate a wrecked Sprite in order to measure whether it would just bolt up correctly. Because of linkage issues, it would seem prudent to use one master cylinder with an equalizer if I can find all the parts.
Some have warned me that mechanical brakes are just not safe. They site horror stories of single brakes locking up causing the car to spin out of control. Others say if the mechanicals on the rear are properly adjusted, they are just as safe as any.
Since my frame is still accessible from the top, now seems to be the time to make the conversion. I would value your opinion greatly on such matters.
• 20180412 - Martin Willis MG Midget brakes
◦ At his request, I went to see Martin today. He thinks the conversion is advisable, and he has most of the parts (est. $200 + unknown hours to assemble)!
◦ Next step is to remove a whole brake assembly from the Singer: drum, backing plate and all in between. Then we can match the bolt up patterns with the MG Midget brake parts he has. He is hoping that we can just insert the hydraulic wheel cylinder where the bridge is on the Singer brakes and let the mechanical cylinder remain as the bridge AND the parking brake!
◦ He claims we need two master cylinders in tandem rather than a 4-port master cylinder with equalizer.
◦ Next, I will pull the rear brake parts and master cylinder and take to him for measurements.
◦ Martin does not like silicone brake fluid. Claims it is always looking for a hole, a way to escape.
• 20180418 - Bud, Bill, Doug Pelton, Martin, Brad brakes
◦ Bud was sympathetic with the situation. Feels that with normal around-town driving and properly adjusted mechanical brakes all would be good. A better grip would be had with softer shoes properly fit to the drums. Hydraulics would be safer, especially at higher speeds. He bought a lot of Bob Rich's extra parts along with Jim Goodwin. His brake parts are stored in his hangar, and I'm invited to prowl through the parts if I like.
◦ Bill Bollendonk converted the "L" to larger drums and shoes when converting the rear mechanical brakes to hydraulic. He has had the car up to 90 mph and claims that mechanical brakes would just take too long of a distance to stop safely. For the BSF bolts I need and possibly the brake parts, he referred me to Doug Pelton at www.fromtheframeup.com in Mesa AZ. Jim Goodwin and Bud have previously mentioned him. Another possibility is Paul Dierschow at www.sportscarcraftsman.com in Lakewood. He thinks I may have to go from a 5/8" to 7/8" bore on the master cylinder. He used one having a 1" bore. (Tilton).
◦ Martin got a look at my brake plate this morning. He feels that a VW wheel cylinder would fit with certain bolt up modifications and that the "parking brake" cylinder rod can be threaded to offer brake adjustment. Therefore, I can use the current shoes and drums. He thinks we need a different (perhaps larger bore) master cylinder. I'm doing the research on the current bore, model, etc. He thinks the new m.c. will cost $100 and the pair of wheel cylinders another $100 + $2-300 if his labor making the conversions + whatever it costs me to run new lines, new hoses, etc.
◦ Brad had the Singer Nine book which I brought home to scan in order to supply Martin with all of the brake info.
• 20180424 - Radiator shell
◦ Took it to J&S to see if it could be polished out. The dude said "no cigar"
• 20180430 - Windscreen, Pat
◦ Went to several windshield/glass places and finally ended up at City Glass. Found "Classic Flats by Pat" who matched and improved the old glass, cut dips for wipers, etc. for $100. He supplied the gasket material and some instructions about using electrician's tape and motor oil, but it still was an incredible task to put the glass back into the chrome frame (read, 4 windlasses and massive struggles. It all finally worked and looks beautiful.
◦ Preceding this, I buffed all chrome areas, tapped the bronze replacement angle braces, shortened the screws, etc. to make the housing ready for the glass.
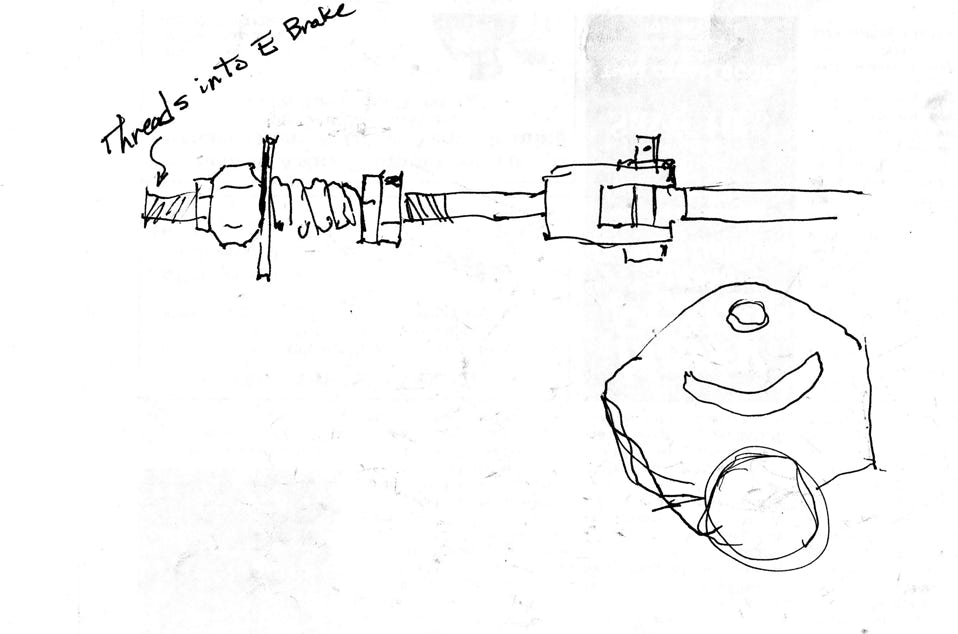
• 20180501 - Brad, brakes
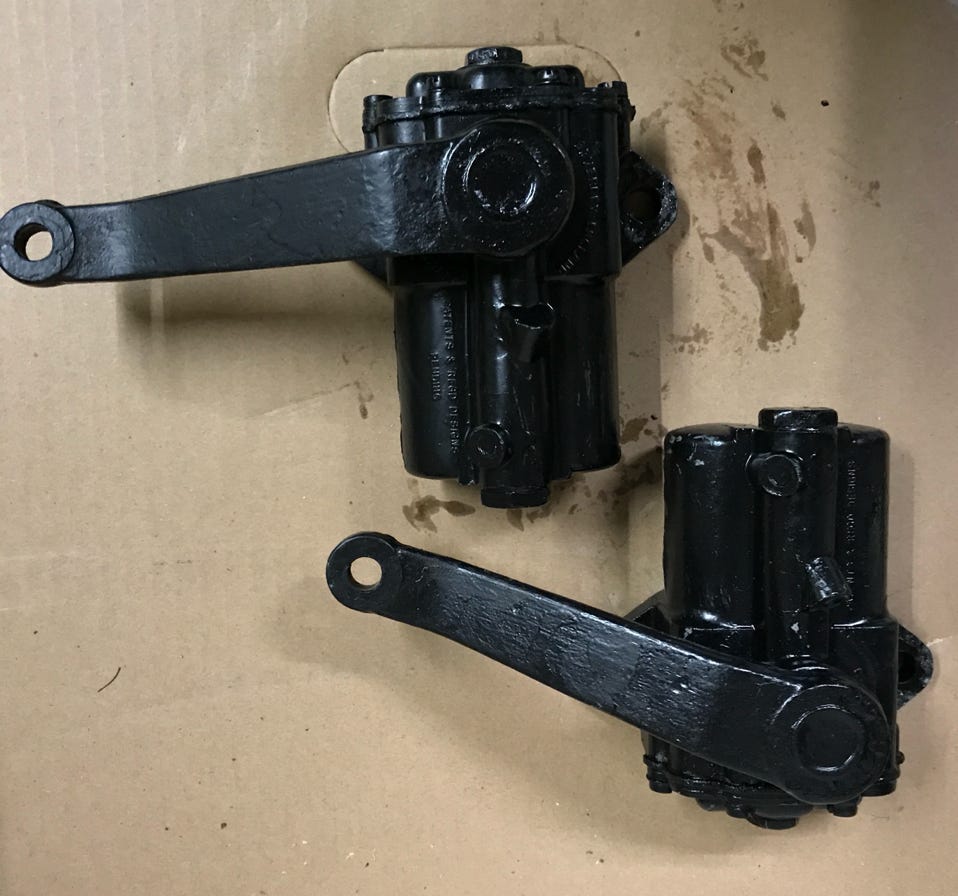
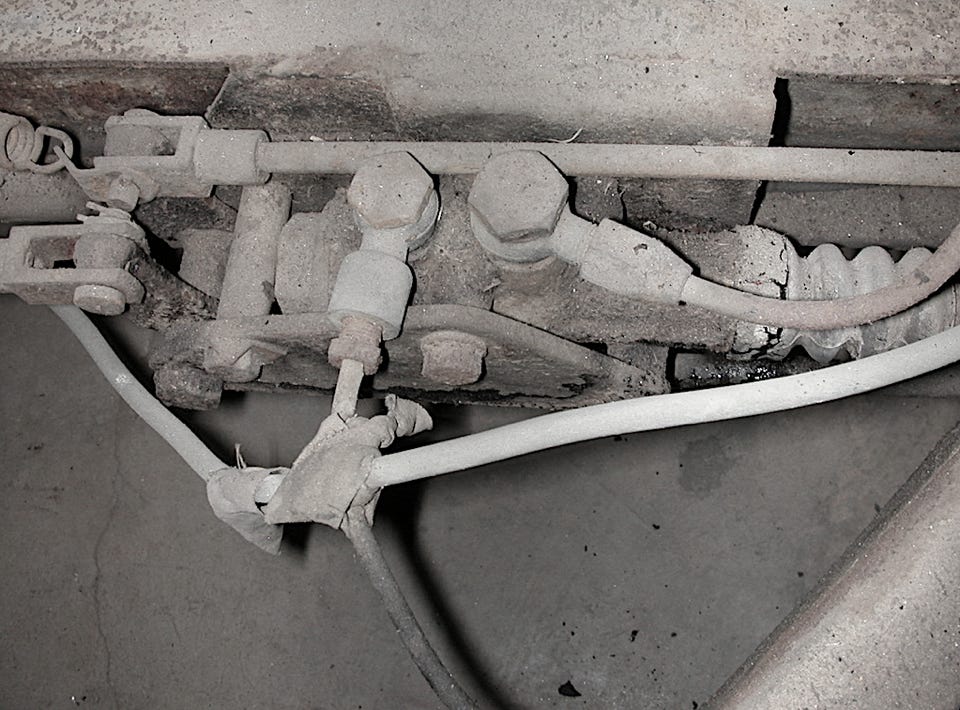
◦ Spent the afternoon at First Rate Auto. Used the BSF tap and die set to reset the threads which had greatly rusted for the male and female parts. Spent the next 3 hours trying to figure out the relative placement of the mechanical clevis and rod assortment leading to the mechanical brakes.
◦ Mega problems refitting the parts, but slow and steady will make it happen.
• 20180502 - Brake breakthroughs
• Confirmed that E brake would not fit due to fat paint. Filed and all worked as it should.
◦ b/c of photo, I searched and found backing plate which covers master cylinder. By end of day, all rods and linkages were attached.
◦ Kudo to Brad who correctly insisted that the slotted plate connected to the brake pedal was upside down. Have no idea who or why this was done, but now everything attaches.
◦ BIG question marks about the linkages that go to the rear of the master cylinder.
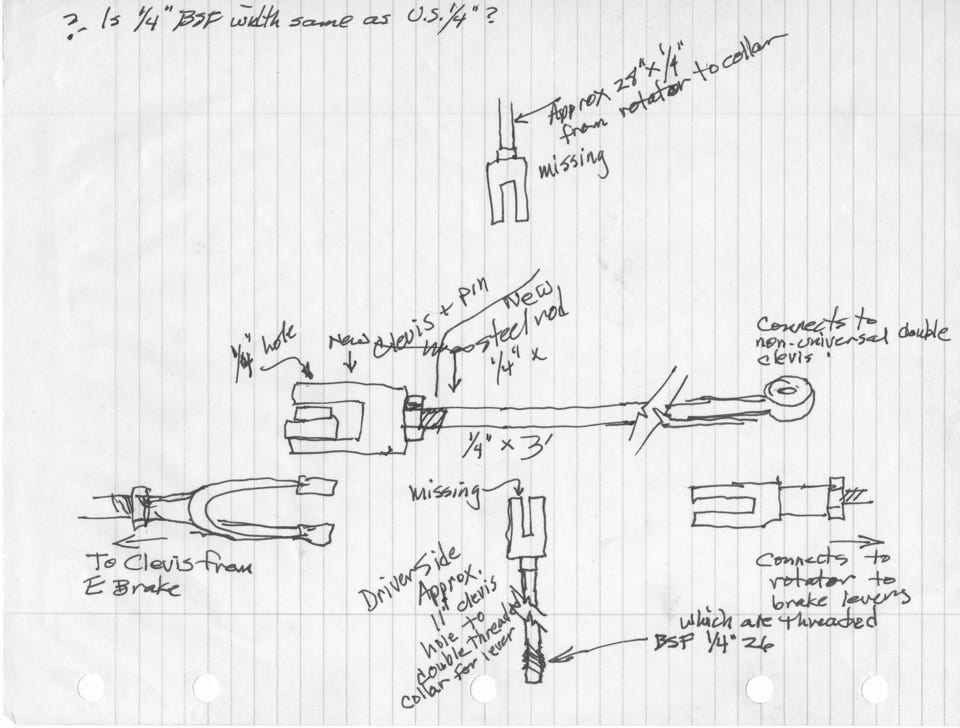
• 20180504 - Clevis solutions
◦ Finding some of my old tear-down photos and just a lot of head-scratching about things "should" work, I've figured out the parts I must make to complete the rear brakes.
◦ Ordered 4 clevis's from Grainger this afternoon. I'll have to put American (SAE) threads on the rod that screws into the clevis and BSF 1/4" 26 threads on the other end which screws into the collar operating the brake lever.
• 20180518 - Cutting threads
◦ Took measurements and checked proposed linkage with Brad. Pending hail storm sent me home to cut the rods and put BSF threads on one end and SAE on the other. Tough on the hands, but successful.
• 20180530 - Clevis shame, motor mounts
◦ I was ashamed of my latest clevis which I had to manufacture from a chrome shelf support purchased from the Restore. I drilled a 1/4" hole for 1/4 - 28 threads instead of using a 7/32" drill. Brad found an old emergency brake cable I brought in, and so I cut off the clevis and tapped it correctly. This should be the last rod for the mechanical brakes.
◦ Brad plans to put the engine, clutch, flywheel, bellhousing and transmission into the frame this weekend. Some former fool has box-welded the front motor mount (thus no rubber vibration dampening) and we can't find and other mounting points except the rear of the transmission. Homework for me.
• 20180531 - Motor mounts, brake shoes
◦ Did lots of homework. Printed off endless photos, made drawings, Googled mercilessly. However, despite all this, Brad proved I don't know poop about motor mounts!
◦ He is going to research some polyvinyl transmission mounts to adapt for the front motor mount.
◦ I learned that my beefy rubber washer separator would not work for the transmission end. Don't you hate it when your mechanic is right??
◦ I "found" the proper transmission mounts in the "Rubber Stuff" bag. Problem is that the bonding rubber is shot. Brad will investigate a source for bonding rubber using the current pieces.
◦ It looks bad for engine installation this weekend.
◦ Mounted brake shoes on the right rear, but they are awfully tight. They also fit with the springs on the INSIDE of the shoes. Typical British to do everything backwards.
• 20180604 - Pilot Bearing
◦ Brad called and said he had found a source to bond polyvinyl to steel and would pursue all of the motor mounts.
◦ He's missing the pilot bearing for the main shaft.
◦ I checked Moss and gave Kim the numbers.
• 20180605 - Pilot Bearing Found
◦ Brad said the bearing was about 1" long - the interior diameter was .56 inches; exterior dimension was .81 inches. He looked everywhere among the parts that I delivered - nothing. I came home and tore the garage apart one more time looking for this piece, to no avail. On my way out of the garage, I happen to spot a box full of copper plumbing scraps which were to be recycled. It must've been divine intervention, because somehow I reached into this box of scraps and pulled out a three-quarter inch copper plumbing union and right next to it was another piece that resembled it greatly, but happened to be the pilot bearing for a 1954 Singer roadster. What are the odds?
• 20180607 - Radiator Shell to Tiny
• 20180615 - Motor mounts & Starter ring
◦ Brad has rebuilt the front motor mount and the two rear transmission mounts with a bonding rubber. They look great but still need a couple of days of final curing.
◦ He still needs to seat the starter ring flush that he turned around.
• 20180914 - Pick up Radiator Shell, Tiny
◦ Tiny sent the shell to Texas, lost my phone #, I panicked, reconnected.
◦ They did a beautiful job. Whew!!
• 20180924 - Cathy Leg, Brad, Wagner, Fogg, BO
◦ Brad succeeded with the motor mounts (took 3 tries) and flipped the ring on the flywheel which engages the starter gear.
◦ Cath broke her leg 7/7/18. I put everything on hold for pretty much 2 months.
◦ Brad hired helper (Floyd Pryor) and moved Singer to rear of shop. Brad came to see the tub and scuttle in early Aug. He can't do the welding. Engine was in pretty much same condition as June until today. Brad has mounted carbs, distributor, water intake and bolted up the drive shaft with metric bolts. I have a long list of homework to get the project moving again.
• Locate missing door hinge. Done
• Modify red brake clevis so Brad can weld joining piece
• Finalize other mechanical brake clevis's and the front brakes
• Find a welder for the cracks and a body shop to finish body work and paint the car. Done
• Bolt down rear hoops over differential
• Supply photos of carburetor linkage Done
• Solve oil filter issue (replacement for A.C Element #M11
• Photos of linkage between clutch pedal and clutch lever emanating from bell housing
• Find or buy bolts for mounting starter Done
• Find generator mounting bracket Done
• Bring fuel tank and other sheet metal parts to Brad for fitting Done
• Decide where and what model of fuel pump to use (mount British f.p. for show)
• Need photos of coil bracket and mount Done
• Find the missing fitting for the water neck intake (photo)
• Locate the oil pressure switch behind (top) of oil filter Done
• Bring radiator
◦ Visited BO Steel. Joe, the welder, rec. Custom Car Engineering on Buchanan St. behind Kmart (couldn't find it) and Greatwood furniture next door for wood frame work, Martin Willis who recommended Wagner Fabrication, Les at Wagner rec. Tom Stoddard or Joe Hamlin for bodywork and painting.
◦ Went to see Brad to get homework list above. Am now working on Sundays with Brad when we both can.
◦ Interviewed Keith Barilli at Fogg's Auto Shop. Really liked him, his approach and the general look of the shop. They mostly restore Porsches. Keith recommends getting the welding done and then loosely assemble the whole car which will show up gaps that need adjustment, locate all the missing parts, etc. He is willing to prime and paint all my parts separately, but feels this is not the best solution since fitting/adjusting pieces fully painted might cause damage to surfaces as well as possible damage during storage.
• 20180925 - Brad, puzzles and solutions, Keith Barilli at Foggs
◦ Acting on Keith Barilli's advice, I started taking body parts over to Brad. Brad not necessarily in full alignment with Keith's advice, but willing.
◦ I printed off a pile of photos which answer some, but not all, of his questions.
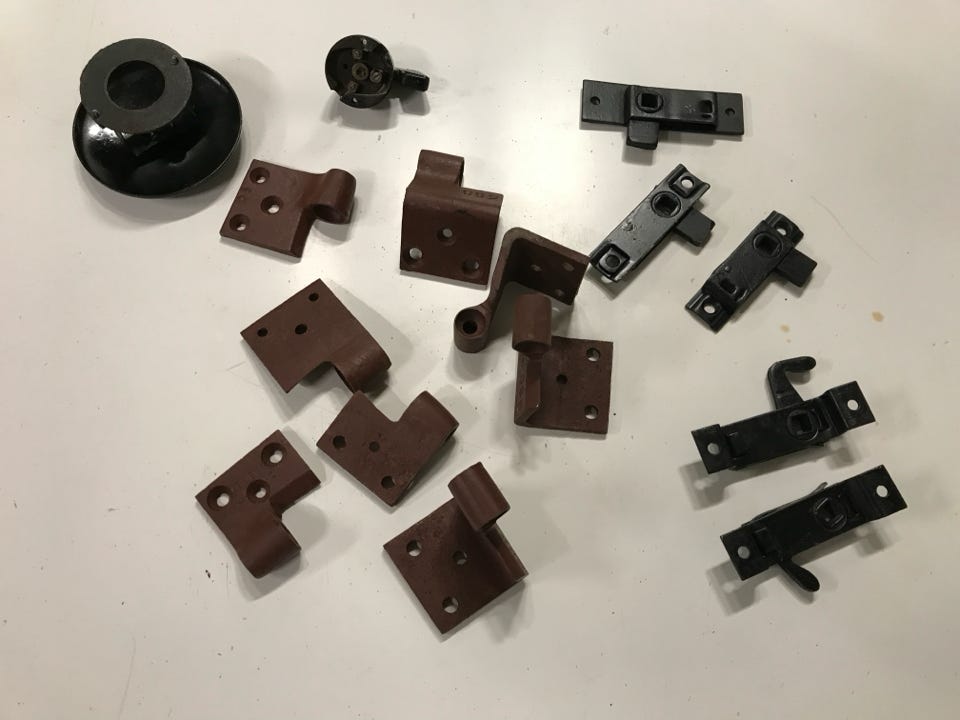
◦ I found the adjusting bracket for the generator, the connecting pipe across the manifold (later discovered to be a connecting pipe for front brakes…damn), the oil pressure fitting and line which will have to be remade.
◦ I took the old air cleaners over to cover the twin Solex carbs until I can order chrome replacements.
• 20180926 - Brackets and bolts
◦ Cleaned and painted the gasoline sending unit, the coil mounting bracket and the adjusting arm for the generator.
◦ Found the rear bracket that the generator bolts to. Also the nuts and bolts which completed the generator assembly.
◦ Found the two unique bolts to fasten the starter to the bell housing and did same.
◦ Found the four bolts and nuts for the rear shocks (will connect them next time).
◦ Sorted nuts, bolts and washers.
◦ Still can't find the linkage to the clutch and the forward bracket that holds the carb linkage.
◦ Puzzled by the angle iron welded to the rocker cover which I believe has something to do with a homemade choke linkage.
• 20180928 - Hoops and Shocks
◦ I managed an hour over at the shop. Most of the time was cleaning up and rethreading bolts and nuts.
◦ Finally got the rubber bumperless hoops fitted above the rear axle.
◦ Next, I got the Armstrong rear shock absorbers mounted just in the nick of time.
◦ Still can't find the linkage to the clutch and the forward bracket that holds the carb linkage.
• 20181019 - Les, Wagner Fabrication, Keith
◦ Keith used his truck to take me and the tub to Wagner Fabrication where Les welded several aluminum cracks in the skin. He found extra cracks and reinforced the area over the trunk. Nice job. Keith is the best! Now back to the wood replacement.
• 20181114 - Woodwork, paint
◦ Using oak scraps, I've screwed together bracing at the rear. Had to turn the Singer upside down. Seems much stronger. Painted the bottom wood pieces since the car upside down.
• 20181115 - Added metal parts
◦ Great progress. Mounted metal shields behind wheel wells. Pounded screw nails in only partial amount. Screws into angle iron look good but are loose. The tire well is not fitting…too tight.
• 20181116 - Cath and back on rollers
◦ Unbelievably, Cathy and I wrestled the Singer back up on the rolling horses. It weighs a LOT more now. Lever, inclined plane, rope hoist. Amazing!
• 20181117 - Undo all the metal! Found missing carb bracket!!
◦ Had to take off all the pieces I added on the 15th. Tighter than a bullfighter's pants! Actually came apart a lot faster than going on.
◦ Shaved all the tight spots (I hope).
◦ Took off the joining piece between back seat and boot. Sanded all down and shaved. Took off the end pieces I “cleverly” added for greater support. Top metal piece that supports spare tire wouldn't fit!
◦ Painted the topside wood
◦ Naval jelly for rusted wood screws
◦ Found the metal gutter pieces that drain water from trunk. Now have to do something with the wood pieces to which they attach. Think a block screwed between the inner and outer curved wood pieces might work.
• 20181110 - Computer down, Singer back to garage, Brad December
◦ Computer hard drive went south, couldn't migrate Time Machine, Singer notes in OneNote preserved in the Microsoft Cloud, most recent photos and stuff on Desktop unreachable. Bought refurbished Mac from Apple, migration not working. Despite 6-8 hrs. on the phone with Apple tech, both iMacs had to go to Voelkers. Fingers crossed.
◦ Talked to Brad who has hired a mechanic to do daily work. B. plans to work on Singer and one other special project during the month of December himself. Still claims I'll be driving the Singer to Fogg after Christmas. Idle dream.
◦ Added the top cover hoops using partial mounted side plates. Discovered hoops narrowly miss being able to fold up behind rear seat. Must remove and shave wood piece.
• 20181118 - Inset boot female lock plates, upper boot water drain.
◦ Short work day.
◦ Scratching head about where to fit male lock mechanism.
◦ Bruce evidently started rebuilding wooden segments of boot. Lots of angle braces. Has routed circular area for guides, but no indication where locks go.
◦ Likewise hinges. Where are the hinge pins?
• 20181119 - Reposition metal
◦ Replace arched ash over back seat
◦ Position upper trunk metal piece. Struggle to get one screw and nut in upper holes
◦ Replace tire wells rear and prep for spare tire metal
◦ Made oak braces for inner wood pieces that hold vertical water drainage metal.
• 20181125 - Screw nails, more wood
◦ Screwed metal panels for inner rear fender wells to pressed metal pieces for front and bottom boot pieces. Tough fit.
◦ Refashioned inner ash pieces, drilled and screw nailed them to the fender wells, took apart, then used screws to clamp the water gutters for the trunk to these side pieces and another to the top piece. Everything starting to feel solid now.
◦ Painted raw wood with black Rustoleum.
◦ Rolling double saw horse on wheels working well. Must hurry to get Prius in out of the rain and snow.
◦ Went to Brad. He has hired a new tech to arrive 12/1 so that Brad can use the month of Dec. to work on just a couple of projects full time…mine being one of them.
• 20181201 - Finalize the tub at home
◦ Lots of struggle, scratching of metal, busting of knuckles, refitting of wood.
◦ Drilled and nailed upper arch between boot and back seat.
◦ Had to sand down the ash on the forward side of the arch to accommodate the hoop storage for top canvas.
◦ Finalized, cleaned up and rolled tub back outdoors under tarp.
• 20181209 - Neal and I deliver the tub to First Rate Auto
◦ Neal brought his pickup down for the weekend and backed it into the upper driveway.
◦ We rolled the saw horse undercarriage and tub up the drive and it matched the height of Neal's tailgate EXACTLY. All we had to do was slide the whole assembly into the bed and lash it down.
◦ Brad met us and we lifted the tub onto the frame.
◦ New guy is there, but Brad still too busy to let go.
• 20181211 - Parts delivery
◦ Took some more metal and wood parts to First Rate Auto
◦ Brad still too busy to work on Singer.
• 20181212 - More parts and map a plan
◦ Took more parts to Brad and listed 9 things that were obvious to me needed to be done.
◦ Consulted with Brad. Can't get the metal piece that holds the floor boards to lie flat.
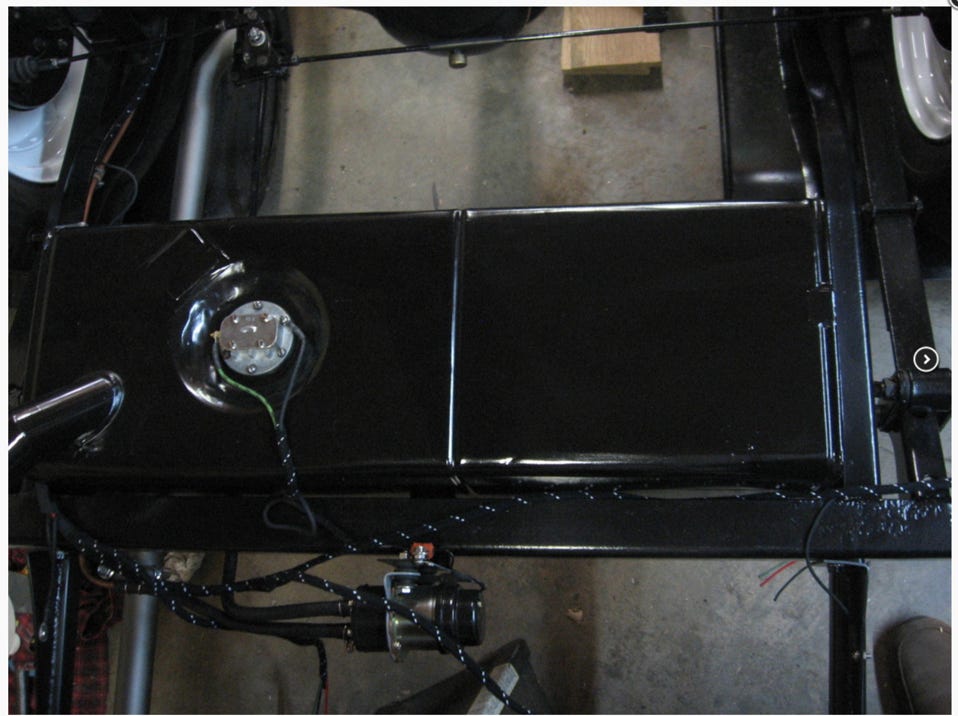
• 20181213 - Gas tank
◦ Found the bolts to attach the gas tank to the frame. It's cushioned with 3 rubber washers sandwiched between two metal washers just like I thought.
◦ Screwed tank on, then removed when I noticed several other nuts welded to the frame. Suspect these are for the rear bumper extensions. Can't locate them…
◦ Threads are rusted and won't accept bolts readily. Used BSF tap and die to clean up all threads.
◦ Found a gasket from an old scrapped Lucas fuel pump that exactly matches the 6 bolt holes to attach the gas sending unit float. Can't find the screws/bolts, however. Brad suggest using spray gasket sealer on both sides when screws are located.
• 20181217 - Rear bumper extensions, Tub fitting, carb linkage, gas tank final
◦ Found the bumper extensions at the bottom of the sheet metal pile.
◦ Cleaned with tap and dye and fitted the extensions
◦ Likewise the gas tank
◦ There was a double piece of ash that I added for extra support that had to be trimmed in order for the tub to clear the springs on the rear passenger side. Now like a glove
◦ Figured out how the carburetors linkage works, found the appropriate bolts/washers, cleaned and installed it. One link arm is on backwards. How is this possible??
◦ Brad and I decided to scrap the angle iron disaster on the valve cover and replace it with a choke cable system of our own design for the accelerator.
• 20181219 - Boot sheet metal, front fender flashing/support and bumper brackets
◦ Wedged sheet metal in boot to match old holes and sunk two of my new 'slotted/1/4" hex' screws in place. Tried to find hinge pins for boot, but think rather they are domed bolts with a lead ball center. (Is this possible?).
◦ Brad thinks all three of my fan belt choices are too short.
◦ He is working on a linkage for the oil pressure sending unit. (Old one was steel braided rubber hose). He bought some parts from Reilly Auto, but is waiting for my gauges before opening them, so he can return for refund if necessary. I'll bring gauges next time.
◦ Both of us worked on the internal fender flashing and front bumper brackets with the additional support for the headlamps just to make the whole assembly near impossible. I finally found all the appropriate bolts and washers but not before having to retap all the threads for both sizes of bolts. I solved the driver's side but must finish the passenger side next time.
Needless to mention, I am not driving the Singer to the body shop THIS Christmas!
Merry Christmas!
Next
Rubber pads (shims?) under passenger side between frame and beam under scuttle.